Principles of macro photography
This article discusses the theories behind common macro photography mods and their tradeoffs, it is not a guide on how to focus or light the scene.
It should first be made clear that, by strict definition, the name “macro photography” refer to only when there is a magnification ratio of 1:1 or greater. However, In recent years, commercial lenses have transfigured the usage of this word to mean just:
This lens can focus closer than what its focal length is typically capable of.
And for the less theoretically equipped, this brings two more questions:
What is magnification ratio?
and
What is the typical focus distance of a lens?
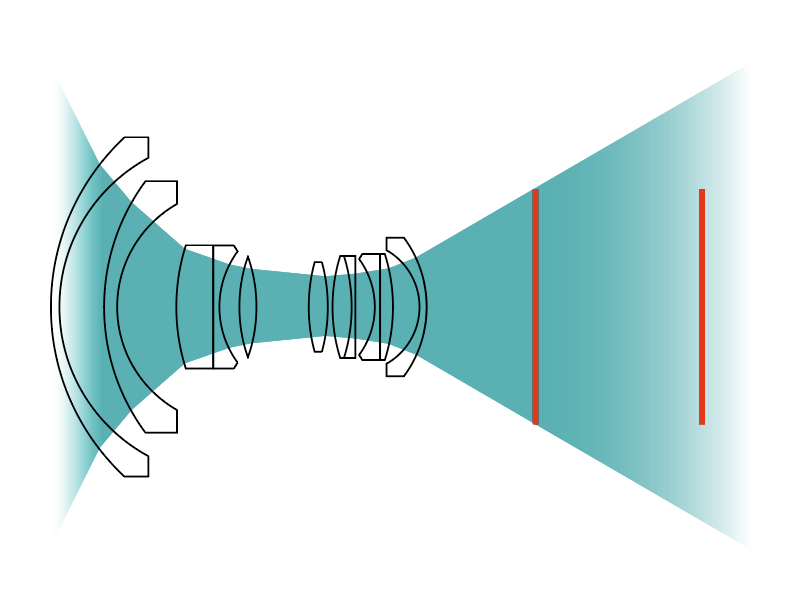
The magnification ratio refers to the size of the object in the physical space (or the “object space”) compared to the size of the object on the image plane (in the “image space”). For example, in the figure below, the size of the object on the image plane is twice smaller than the actual object, so there is a 1:2 magnification ratio, or to say the system has a 0.5x magnification.
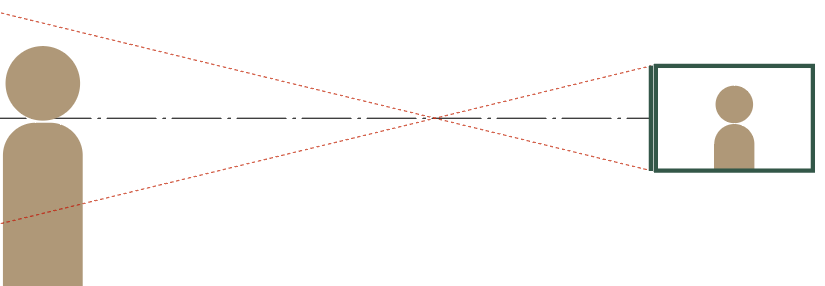
0.5x magnification example.
In comparison, if the size of the object on the image plane is the same size as the physical object, then there is a 1:1 magnification ratio, or 1x magnification.
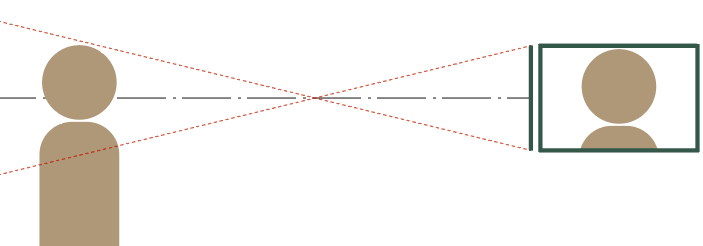
1x magnification example.
The images above ignored the lens and treated the system as a camera obscure model, in such model, every point in the object space is perfectly imaged into the image space, so everything is clear and in-focus.
However, for a lens, each point in the object space only focuses as a point at a single distance in the image space, at other distances the point would not be imaged as point, i.e., out of focus. So the lens has to actively set to be focusing at somewhere (there is also the issue of point spread function and circle of confusion, but they are beyond the topic here). The relationship between focal length, focus distance, and image distance can be generalized as the following thin lens equation :
\[
\frac{1}{f} = \frac{1}{u} + \frac{1}{v}
\]
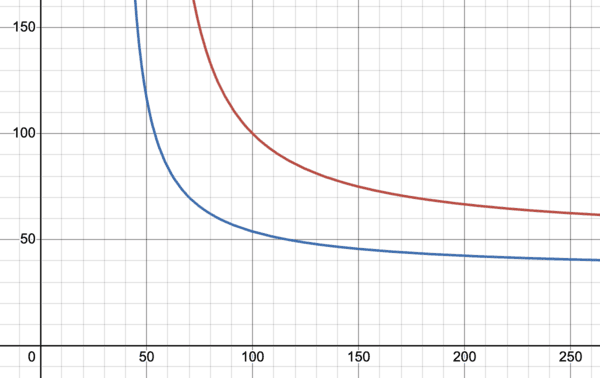
Where f is the focal length, u and v are the object distance and image distance respectively, it is obvious that the object distance and image distance follow a rectangular hyperbola relationship. The image below shows the focus graph when f=50mm (red line) and when f=90mm (blue line):
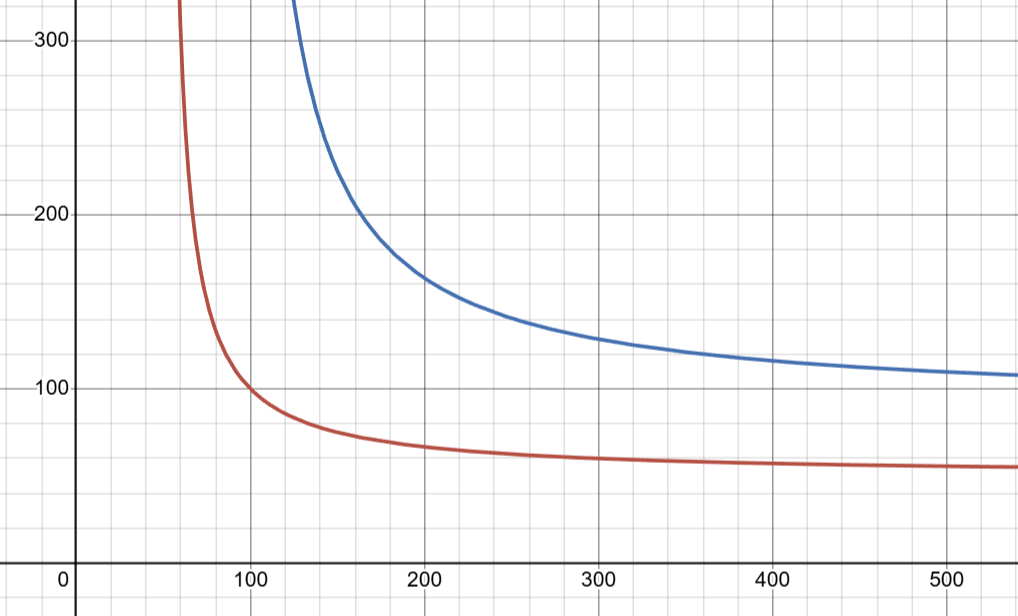
Focus distance curve when f=50 (red) and f=90mm (blue)
Let’s say the horizontal axis means object distance and the vertical axis means image distance. Note that when the object is located at 500mm (20in) away, to focus on that object, the 50mm lens (red) has to move its image plane to 55mm, whereas the 90mm lens has to move its image plane to 109mm. In another word, the 90mm lens has to move its image plane almost twice as far away as the 50mm. Or put back to photography term: to focus on the same object, the longer focal length lens has to move a much longer distance than the shorter focal length.
Photographic lenses are not a thin lens, but for the ones that uses block focusing, i.e., the entire group of lenses move together, their focus relation still obeys the focus formula (floating element will be discussed in the future). So when the lens focuses at a close distance, it has to move forward in order to increase the image distance, this is reflected as the lens “extending outward”.
And since image quality generally drops at closer focus distance, the minimum focus distance is normally clamped to a range for each lens. Not to mention there is only so much range that the consumer would accept for a lens to protrude out.
For this reason, the minimum focus distance tend to have a positive correlation it focal length. A 28mm lens typically can focus as close as 20cm (8 in) or less than a feet to the object; a 50mm lens can focus to somewhere around 40cm (16 in), and a 90mm would be considered having a great close focus if it can focus at less than a meter (3 feet).
What the modern usage of macro changed is that the name now just refer to when a lens can focus much closer than the aforementioned typical focus distance. For example, the Canon RF 85mm f/2 Macro IS STM only has a 1:2 maximum magnification ratio, which does nor strictly count as a macro lens. But it could focus up to 35cm (1.15 inch), much closer than most 85mm lenses, so it got the macro name slammed on it.
With the basic concepts defined, the following sections discusses how the three common types of macro modifications work. Please note that in the following discussion we assume the lens is a block focusing lens, that is, the elements in the lens move together and have no relative movements during focusing.
Extension tube
Extension tube is very easy to understand, recall the focus formula is:
\[
\frac{1}{f} = \frac{1}{u} + \frac{1}{v}
\]
Extension tube achieves close focus by simply increase the image distance beyond what the camera/lens was mechanically capable of. If we treat u as image distance, an extension tube can easily double it. To balance the equation, v now has to become \[ \frac{2uf}{2u-f} \]
As an example, assume u=2f, then v would also be 2f. If then u is doubled, v would then become \[ \frac{4f}{3} \]
This is shorter than the original, meaning the object just got closer.
On the surface, a lens should then be able to focus at any object in front of it regardless of how close there are. But there is a reason why most lenses does not allow itself to keep extending and focus at closer distances.
For lenses that are not designed to be macro lenses, during the development process their optimization is performed assuming the incident lights are collimated, that is, emitted from objects at infinity. When the conjugate (relation between image distance and object distance) changes, the aberration balance remain under the assumption that incident rays are collimated, thus losing optical performances as the system focuses closer and closers. As an example, the image below shows the MTF chart of the Leica Elmarit 135mm f/4 lens when focuses at infinity (left) and when focuses at 0.7m (right).
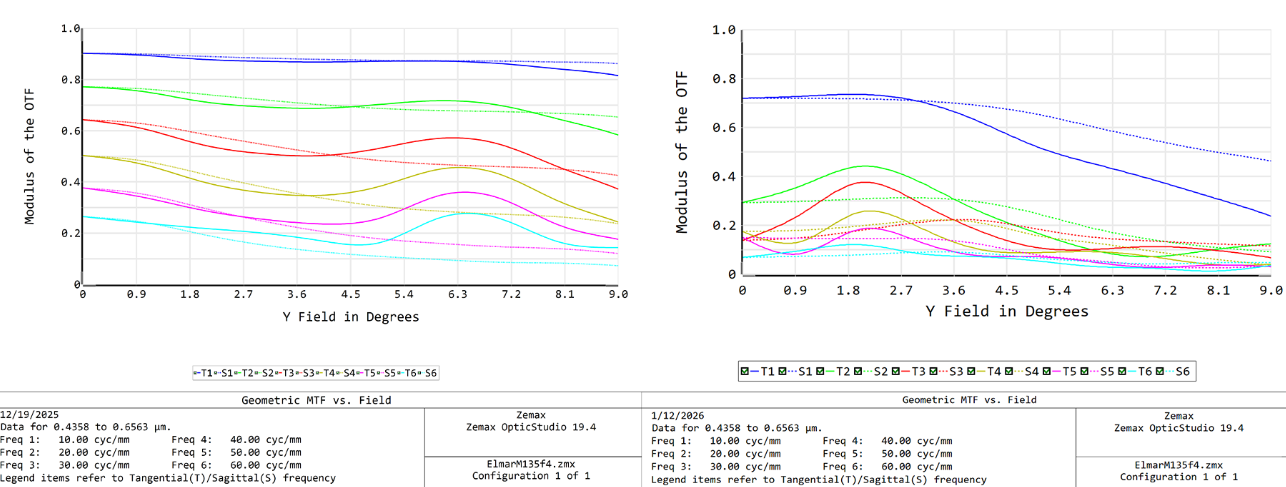
MTF comparison of the same lens but at different focus distance
(for those who sees MTF like these the first time: the vertical axis means contrast, pure black vs. pure white would be 100% contrast, marked as the 1 at the top. The horizontal line means field angle, higher angle means it’s closer to the image corner. Each colored line represents a frequency, think of them as repetitive lines. If the line is high, it means that frequency is reproduced very well; if it’s low, it means the lines have lost contrast and looks all smashed together. Generally, for film, we want the 20 line to be above 0.5, i.e., 50% contrast. For digital, the 40 line should be above 0.5)
Another issue created by extension tube is the increase of working f-number and the resulting lack of light.
The f-number in itself is measured as the entrance pupil diameter divided by the focal length, but at close focus distance, the ray cone becomes slimmer, rendering less light arriving at the image plane (skip this sentence for any optics and photonic majors). Think this way, the ray collected by the lens is fixed, but as the image plane move further from the lens, there are less light that is being collected:
In the figure above, the two red lines represent image plane. They are the same size (despite the left one may look bigger), but the one on the left apparently collect more lights than the one sitting further back on the right (this technically has to do with the position of the exit pupil of the lens, but it is again exceeding the curriculum for this article).
Effective f-number is proposed to quantify this change, for a symmetric lens, it is defined as:
\[
f _{eff}= f \left( 1 + M \right)
\]
Where M is the magnification (how I wish SquareSpace supports LaTex). When the object is at infinity, M is almost 0, and effective f-number is the same as the f-number. But at 1x magnification, the effective number is twice the value as the f-number. Think of a 50mm f/2.8 lens using block focusing, the equation above indicates that at 1x magnification, the effective f-number is now f/5.6, this lens just become two stops slower simply by the merit of focusing at a close distance.
Numerical equations does not really matter here (nor do I think people care), what matters is that from these theoretical knowledge we could derive that:
Extension tube produces worse image quality.
Extension tube makes it so that less light is received by the detector.
I am not here trying to bad mouth macro extension tube. Their disadvantages are optical and objective (pun intended), and there are ways to mitigate these disadvantages. The lack of light can be compensated with flashes, and most modern lenses have an improved image quality when stopped down, so macro extension + flash + small aperture is still a fully workable macro solution. Plus, the shallow depth of field at close focus almost always require the lens to be stopped down, so in some occasions the drop of image quality may not be visible at all.
Front macro filter
Another common way to shot macro is to add a positive powered lens at the front and thus allowing the system to focus closer. These filters are sometimes also called “diopters” (but this name should not be advocated, since diopter is technically a measurement unit for optical power).
However, what truly happens is not the system can now “focus closer”. Like a magnifier, the front macro filter in itself is a positive lens that can form a real image, so when put in front of a taking lens, it directly modifies the power of optical system. Recall the focus formula again:
\[
\frac{1}{f} = \frac{1}{u} + \frac{1}{v}
\]
When a macro filter is placed in front of the taking lens, f, the focal length of the entire lens changes. However, within that focus equation, the image distance does not change, so the object distance is forced to change in order to keep the equation valid.
Let us consider an example, say a macro front filter is attached onto a 50mm taking lens. The macro filter itself has a positive power by definition, so the entire lens system now has a higher power than before (the less optics-prone people may find it counter-intuitive that shorter focal length has a higher power. Think it this way: higher power -> bends light more effectively -> light converges faster -> focal point is closer -> shorter focal length). For the sake of convenience, let us say the entire system is now equivalent to a 35mm lens. Now compare the same focus equation graph:
50mm is the red line one on top, 35mm is the blue one at the bottom.
Swapping the definition of axis this time and treating the horizontal axis as image distance. Again, because the lens and the camera is fixed, the detector does not move, the image distance remains the same. Say the image distance was at 100mm, with the old 50mm (red line in the figure), the focused object is located at 100mm. But with the macro filter attached and the system transfigured into a a 35mm lens (blue line in the figure), the same 100mm image distance now has an object distance of 53mm, much closer than the old system.
But everything has a price, and for front macro filters, the tradeoff is losing infinity focus and often a significant reduction of image quality.
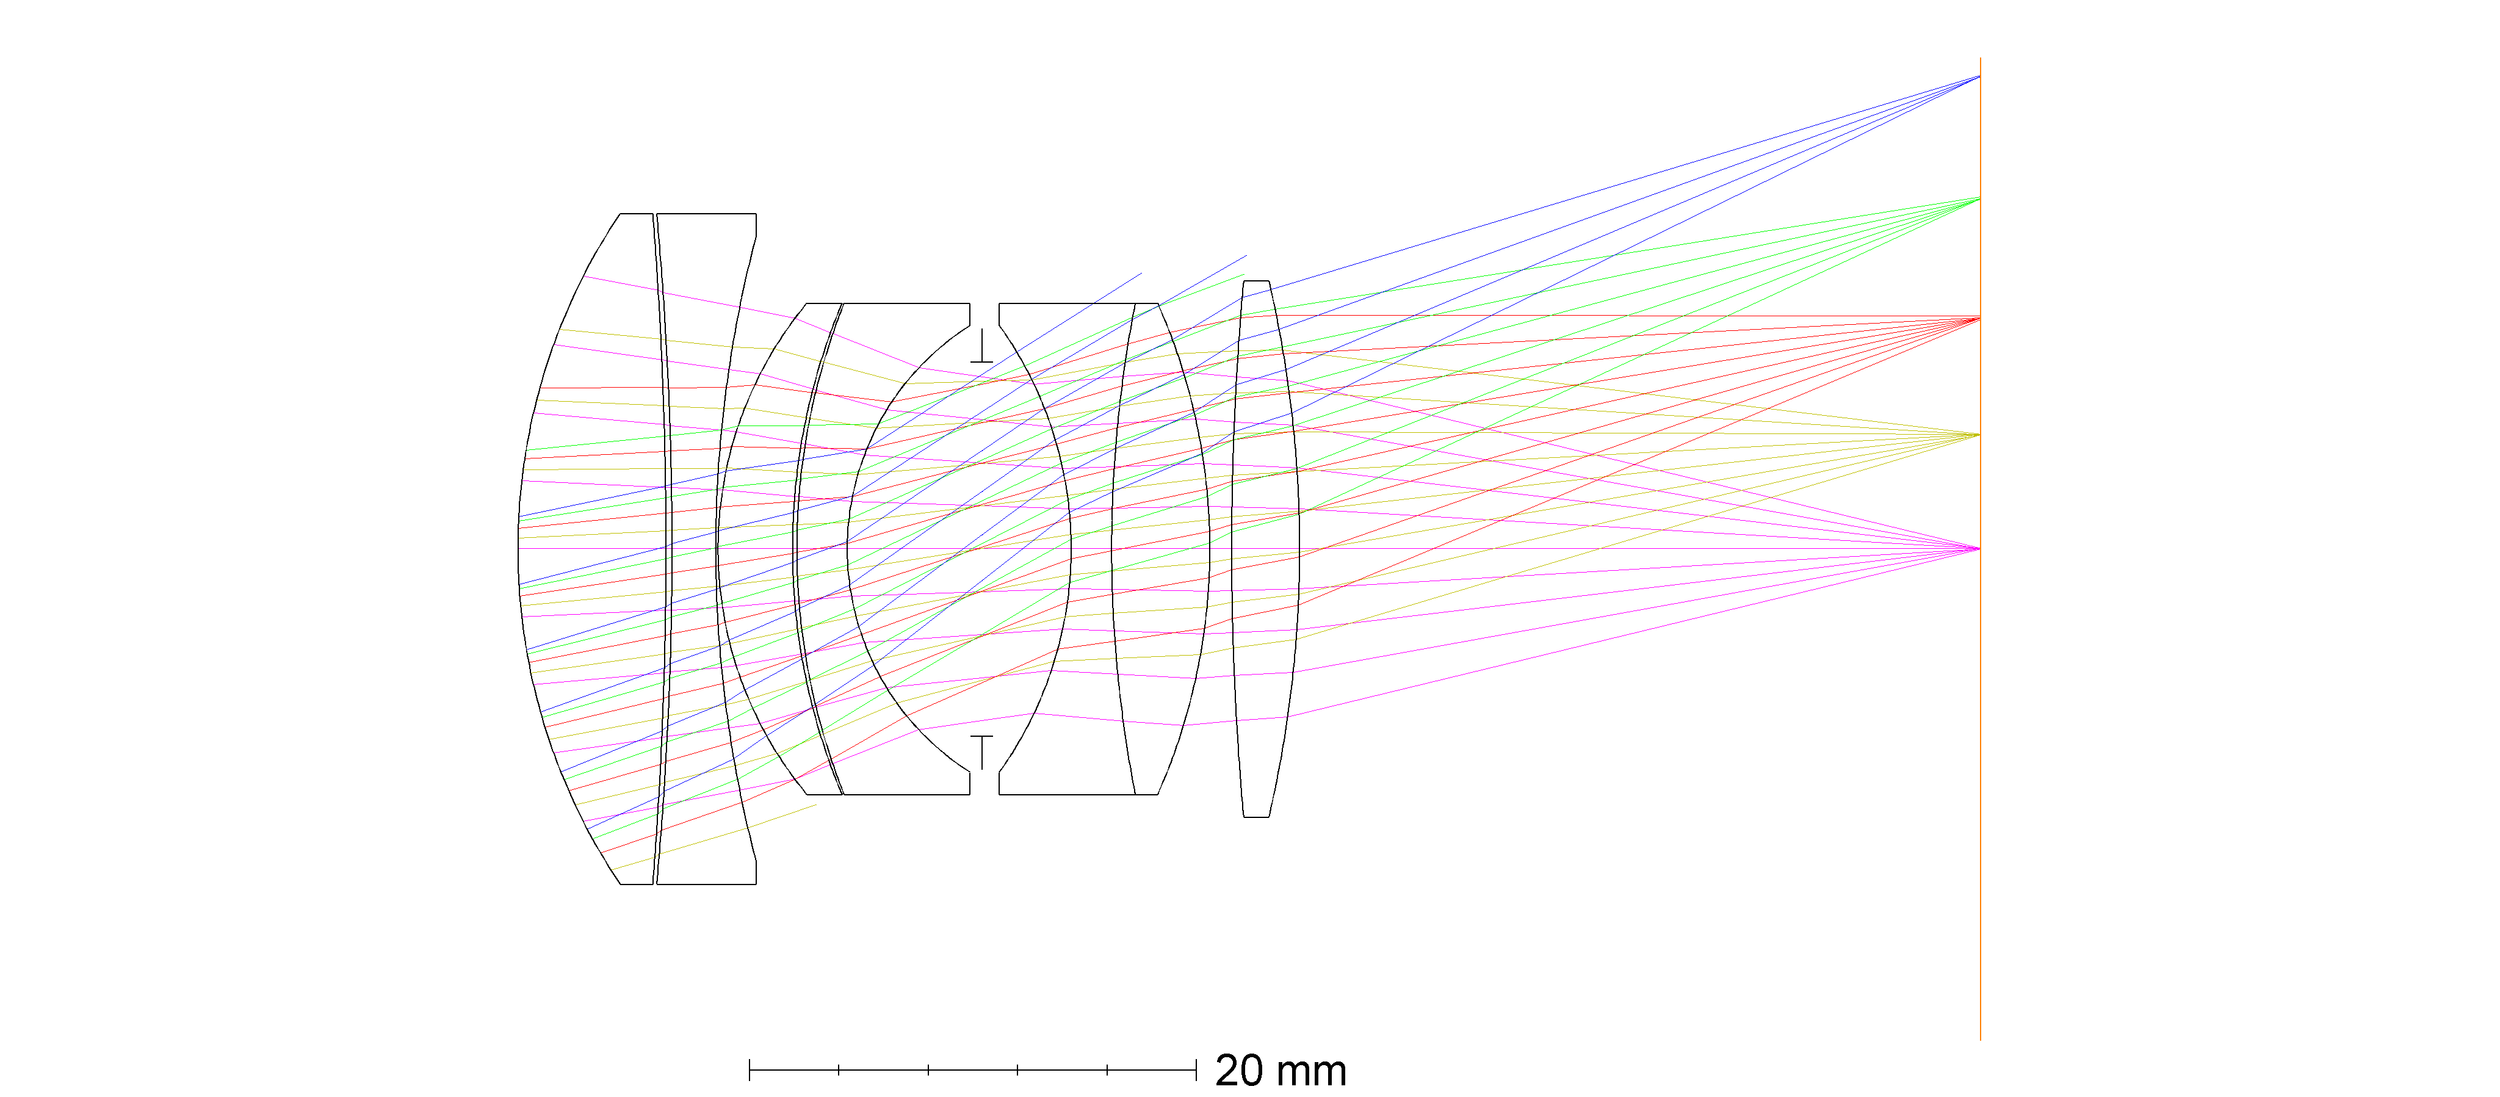
Let’s look at an example. The image below shows the optical layout of the Leica Summicron 50mm f/2 SOOIC-M when focusing at 1meter. For this lens, this is the closest it could mechanically reach, which is not ideal for even close-up, let along macro.
Now adding a macro attachment and re-focus the subject. In this case, the macro lens is a slightly curved glass made from BK7.
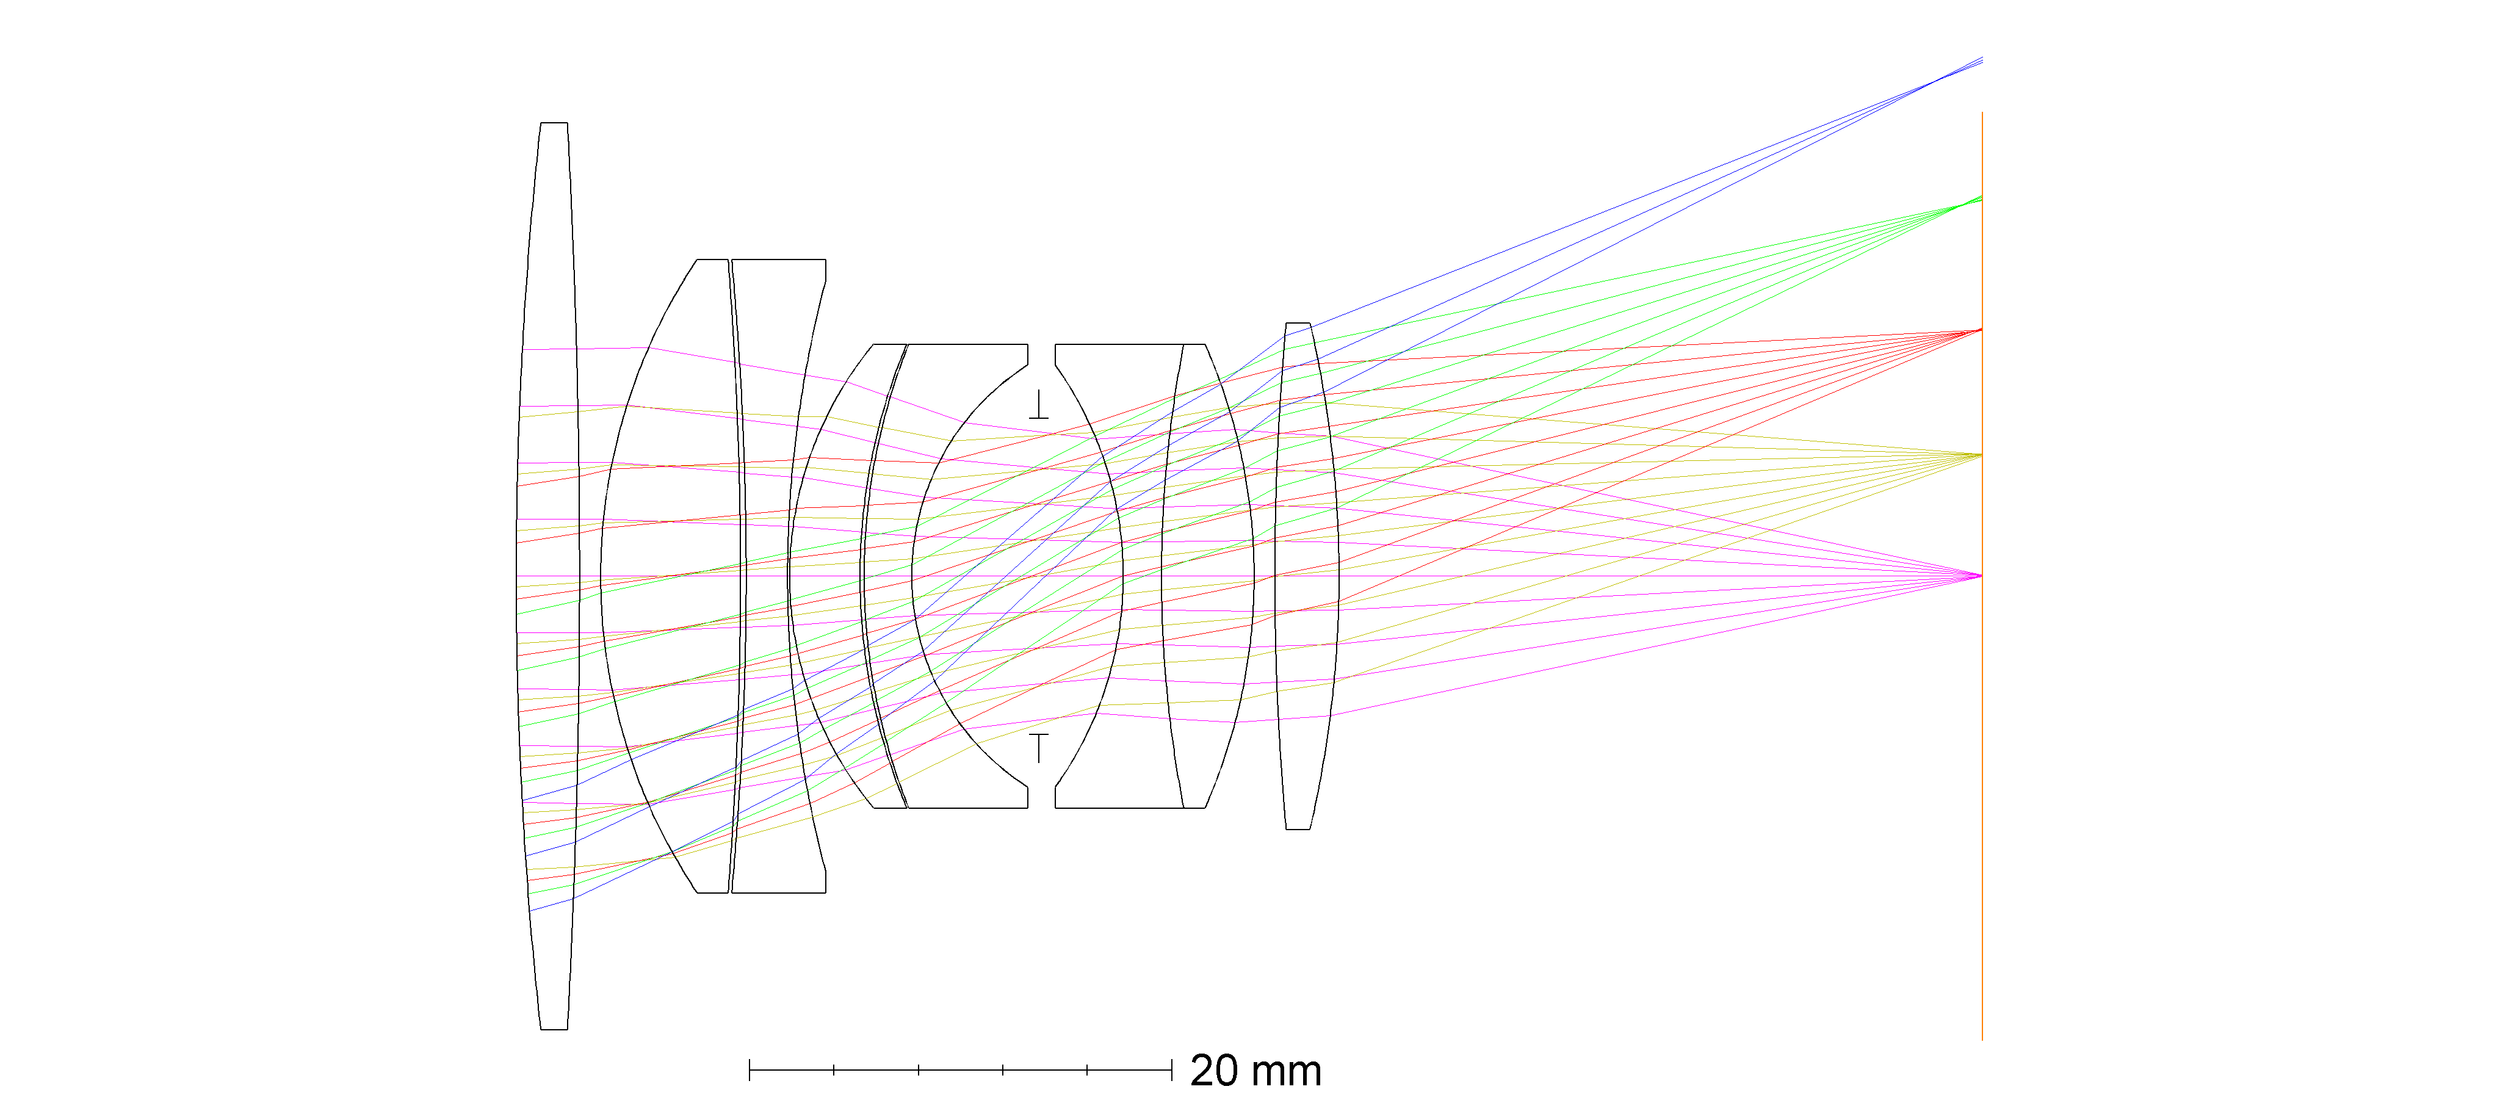
Two things changed here:
The subject was at 1 meter previously, but now, it can be at 0.2 meter.
The lens’ focal length has changed from 50mm to 45mm.
This is a supper effective for macro, but again, what must we pay in return?
Let’s first look at the MTF difference, the most obvious predictor of the overall image quality for in-focus subjects:
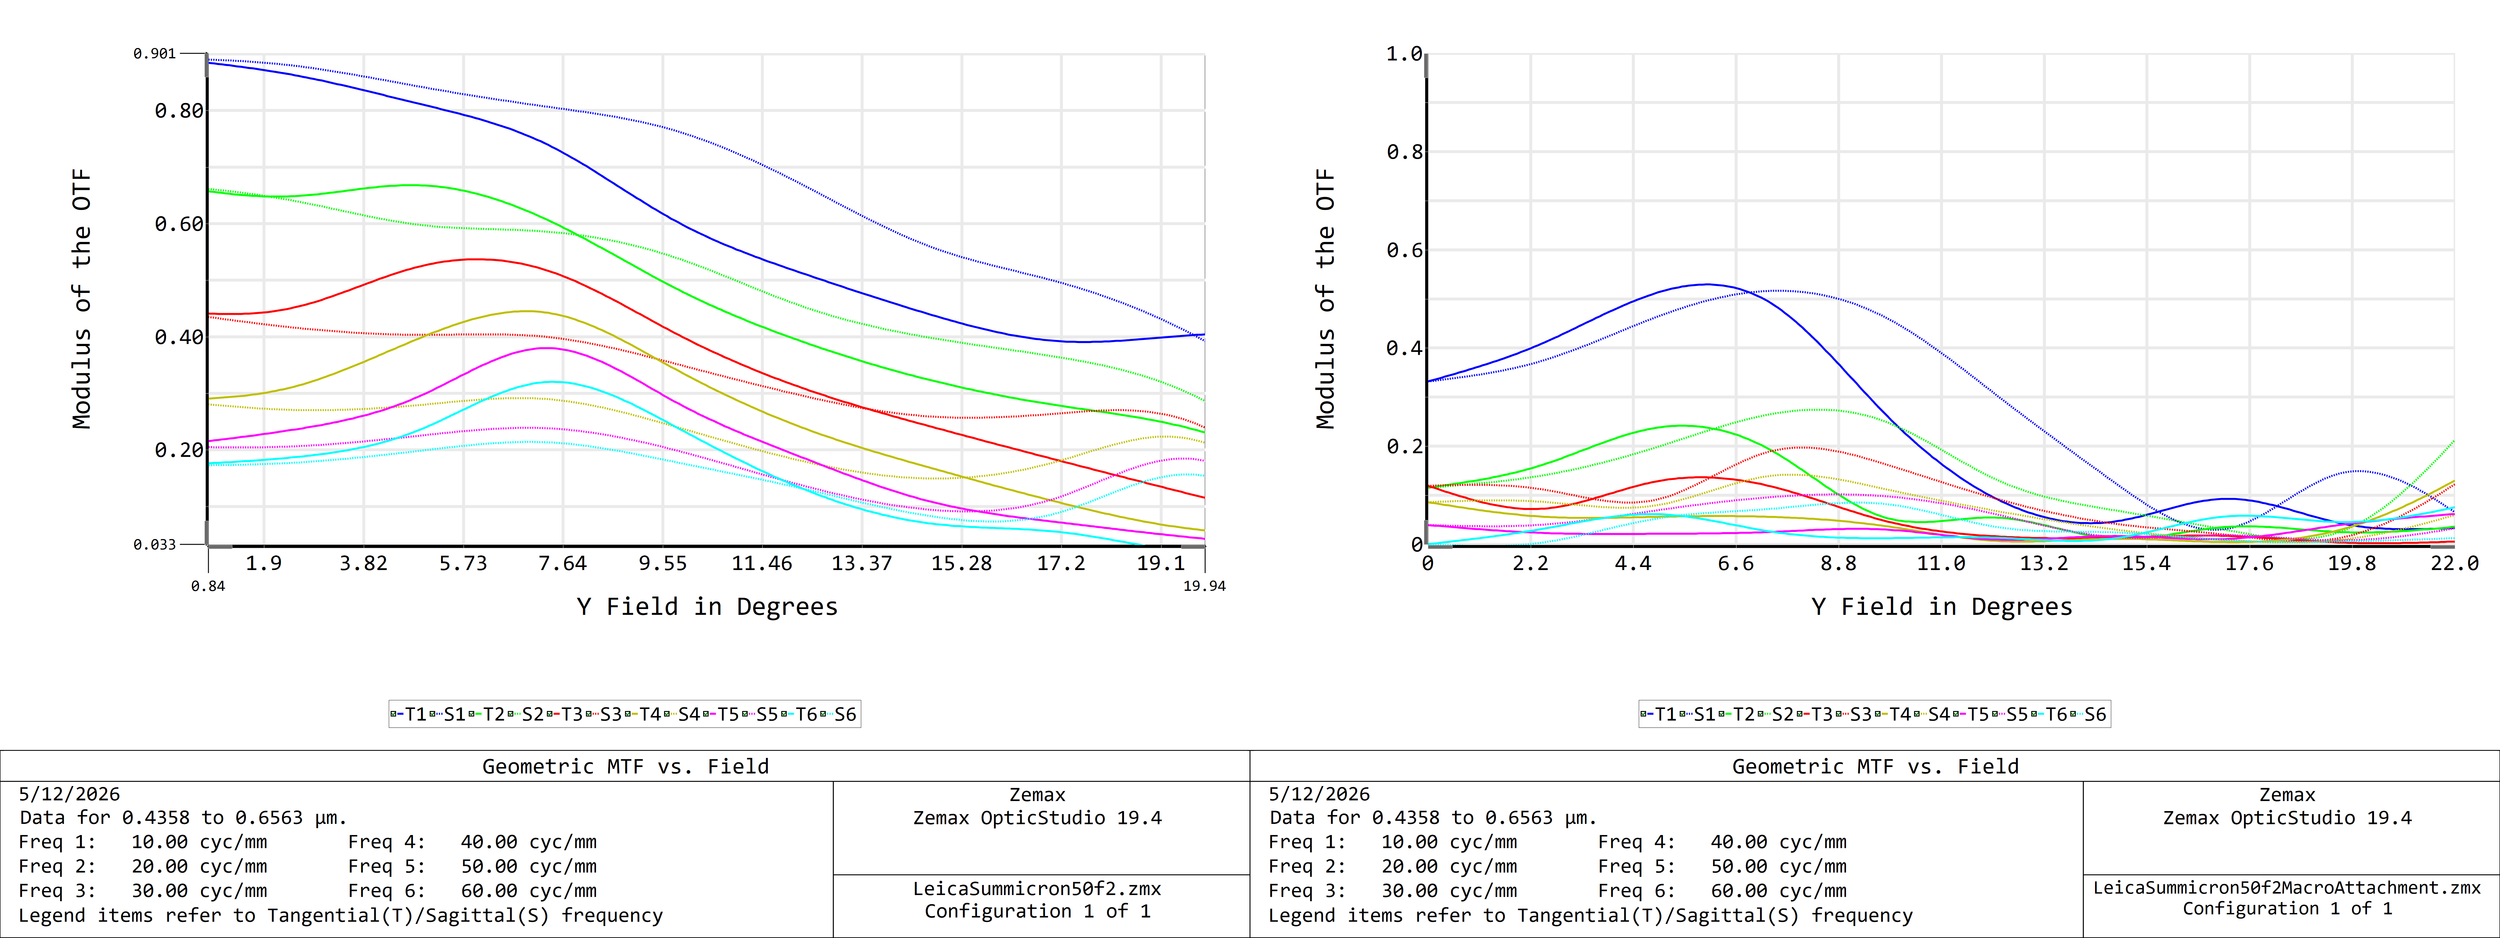
Original lens at 1 meter minimum focus (left) and with macro attachment focusing at 0.2 meter (right)
Well, looks like for the macro attachment, even the 10 line cannot reach 50% contrast, we effectively won’t have anything in clean and sharp focus.
A single positive lens also contributes a huge amount of uncorrected petzval sum (field curvature), as illustrated in the image below.
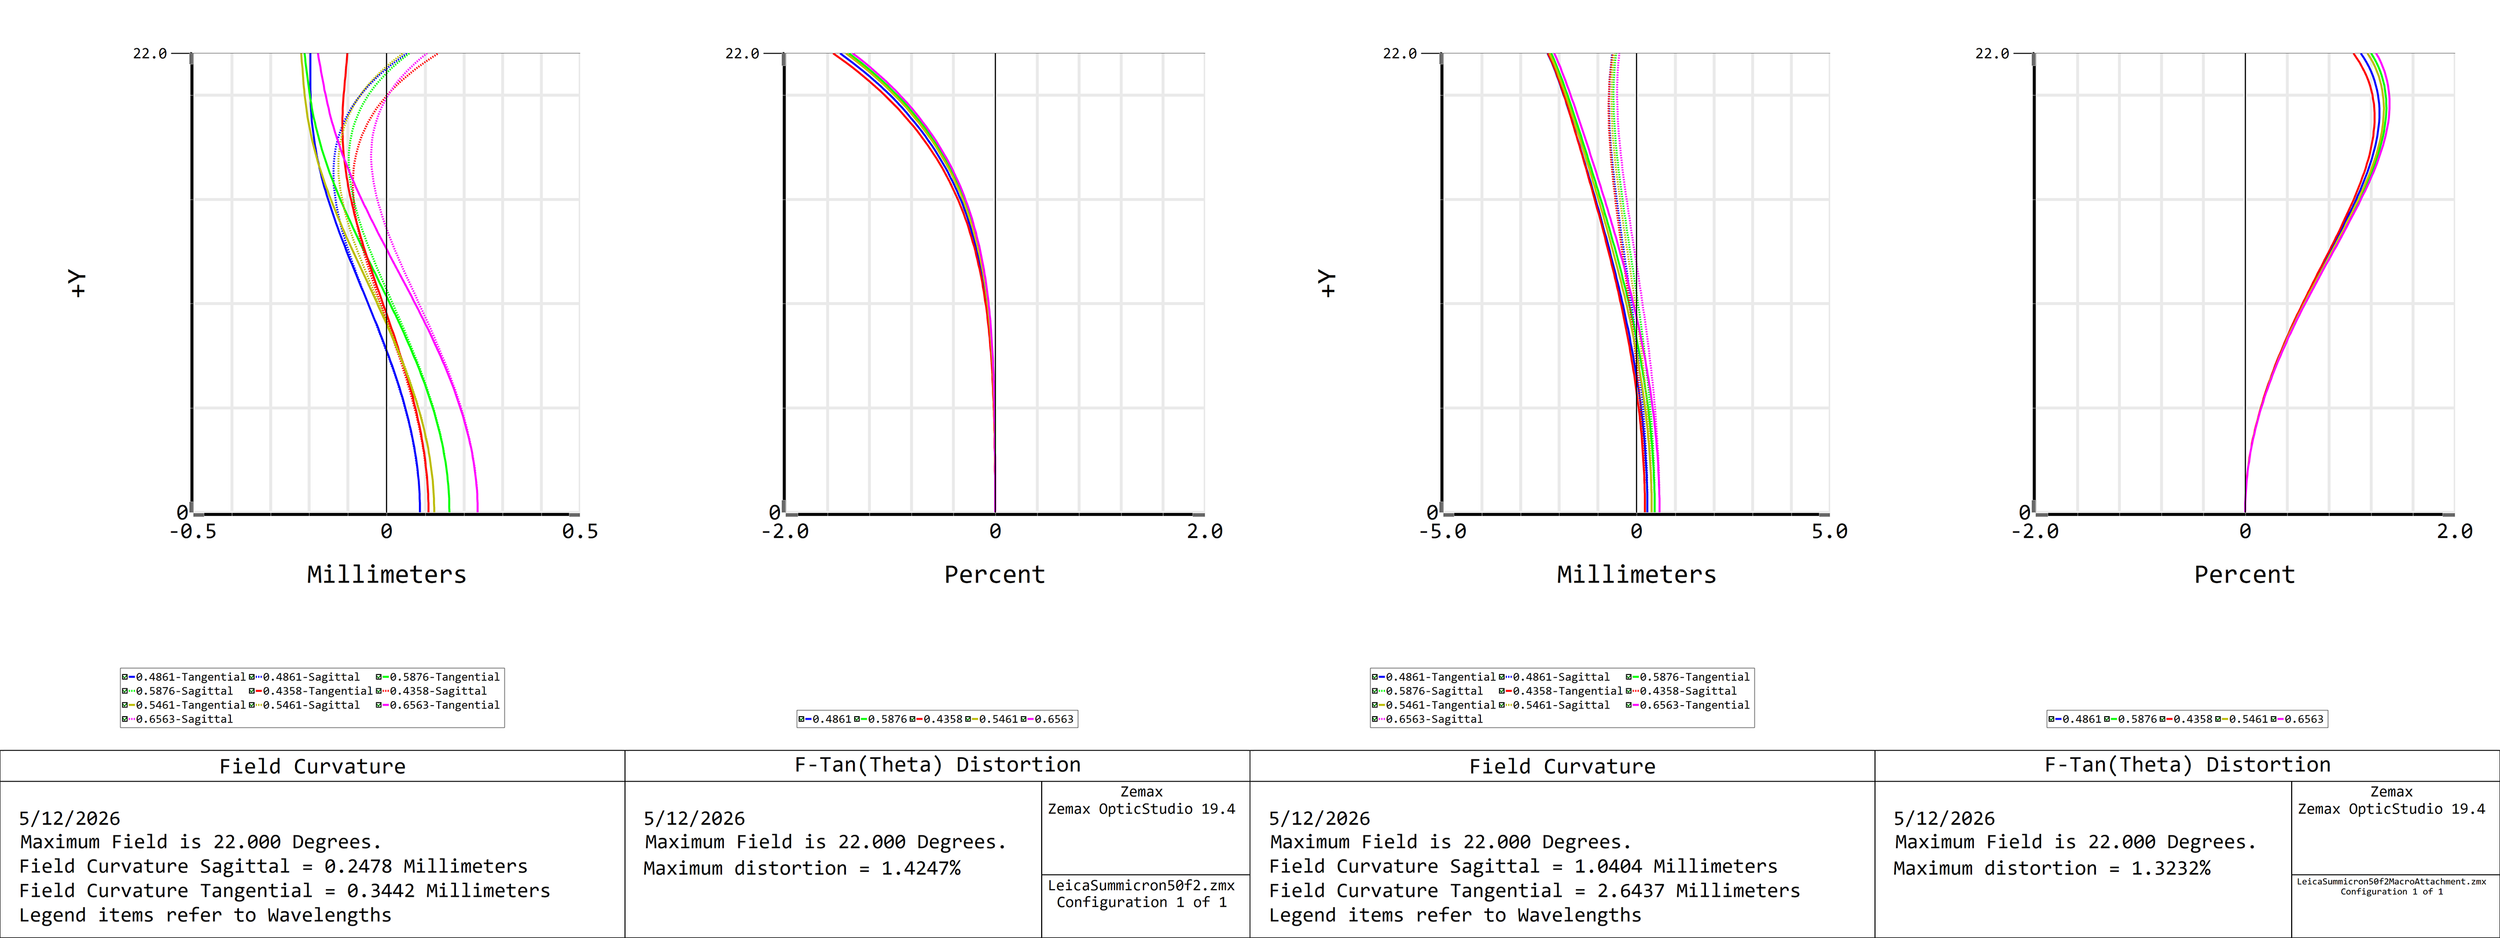
Original lens at 1 meter minimum focus (left) and with macro attachment focusing at 0.2 meter (right)
Maybe the two sides look similar in shape, but mind you, the right side field curvature horizontal axis limit is 5 millimeter where as the left side is only 0.5 millimeter.
This is why the image corner of a lens with macro attachment often look more blurry — it literally could not be in focus. And since field curvature is not correctable by stopping down the lens, there is also very limited improvement when you decrease the aperture. Stopping down the lens in this case only increases depth of field and reduces several other 3rd order aberrations, but the increase depth of field often struggles to offset the large field curvature and its defocus effect around the corners.
using an example from myself, the image below was shot on film using an Hassleblad Zeiss Planar 80mm f/2.8 at f/11 with a diopter.
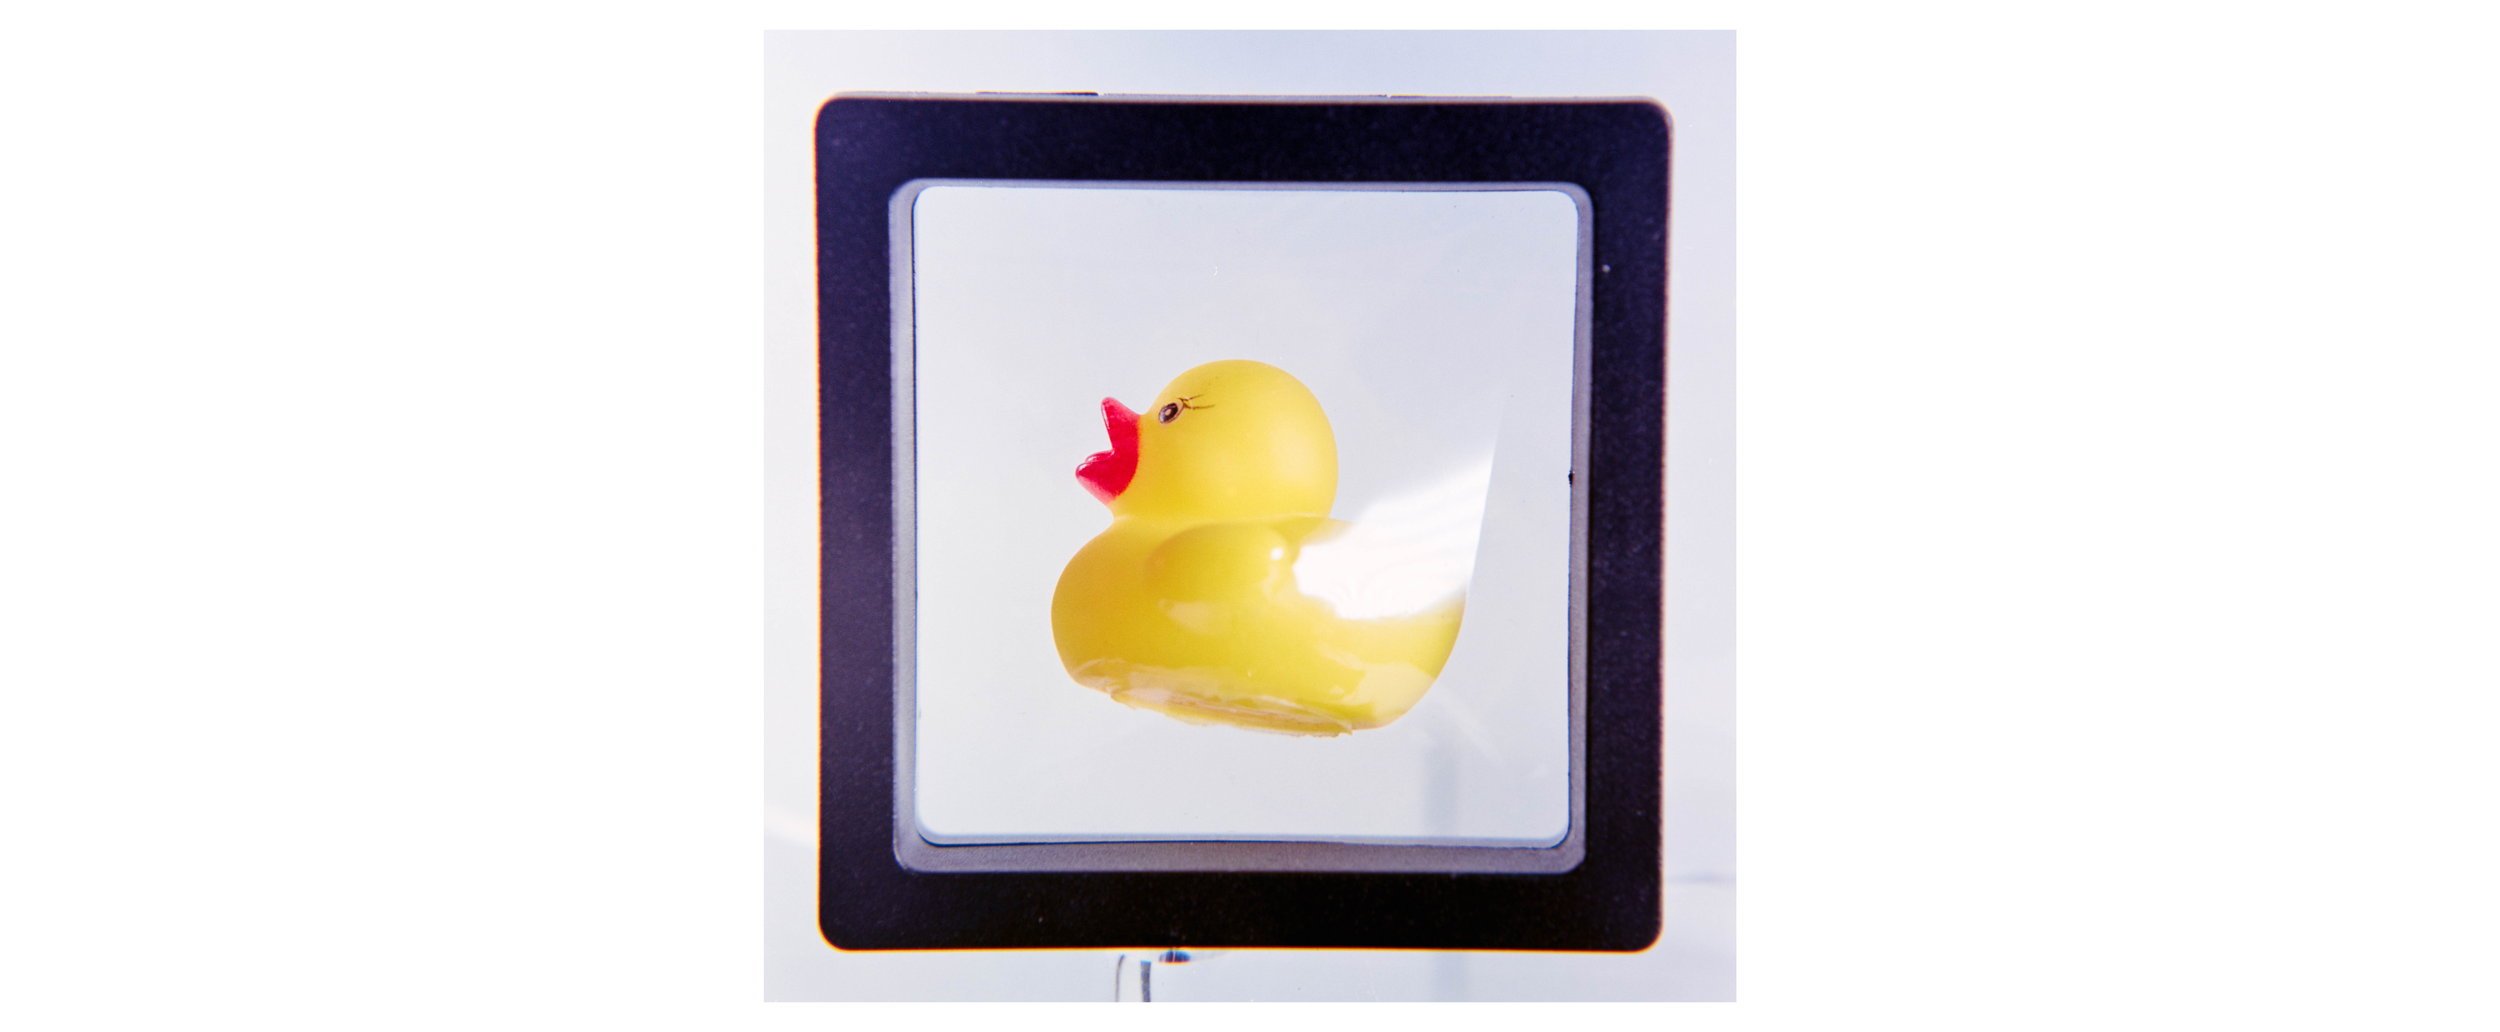
The frame is in fact highly rectangular, but it appeared to have a pin-cushion distortion. Additionally, there are visible blurriness and chromatic aberrations around the edges, both of which are not of the natural product of a Zeiss Planar 80mm f/2.8 at f/11.
(as a anecdote, the image itself is on film, so it was scanned using a dedicated macro lens — a double macro!)
Note that these issues are here mostly because the macro attachment we used is a singlet with literally no corrections. If, instead, a doublet or a cemented triplet that has been designed with proper correction is used, the result will have significant improvements. Although, as one would expect, good attachments are expensive, sometimes even more expensive than a whole beginner-level macro lens.
Reversing the lens
This approaches feels like an early-2000-frutiger-aero-exploration now, I have not seen anyone doing this for a while… which is understandable since it is most effective for SLR lenses and it is a mirrorless age now.
Reversing the lens and make it macro still is based on the thin lens focus equation that we have used through out, but this time, we will be looking at where that f is defined.
A complex lens with many glass lenses still has a focal length, but its thickness apparently makes it hard to find a place where we calculate its focal length. The process is done by tracing a collimated light through the lens and invert the exiting rays with the incident to acquire a principal plane. The on axis point of the principal plane (the “nodal point”) is where we calculate the focal length (technically there are two principal planes but this is not important here, both of them share a similar positional relationship).
Now combine this knowledge with the thin lens focus equation, it is obvious that the closer the object is to the principal plane, the larger the magnification.
During the SLR and DSLR era, most cameras have a flange distance of around 44mm, so for a normal focal length like 50mm or wide angle lens like 28mm, their principle plane(s) has to reside in or behind the glass elements. When the lens is inverted, the principal planes are then swapped to the front, which simultaneously increases image distance and reduces object distance. As a result, the same lens suddenly has a higher magnification.
It then makes sense why reversing the lens is less common in the mirrorless age. For one, mirrorless camera allowed wide angle lens to go back to the more symmetric design instead of retrofocus, which moves the principal plane back into the middle of the lens and consequently reduced the effect of lens direction. Secondly, lenses for mirrorless cameras are increasingly more likely to be focused by wire, so when the lens is inverted, the focus ring can do nothing and there is literally no room for picking focus. The fact that reversing the lens can only be mounted onto the camera using the filter thread also means that only some small lenses can be used this way, larger lenses would risk damaging the mount or the adapter.
Summary and conclusion
Without buying a dedicated macro lens, there are three main ways you could “convert” a normal lens into a macro lens, each with their drawbacks.
Using extension tubes can be done easily without breaking the bank, but it also changes the field of view and require much longer time of exposure. The tubes are also harder to control since there are only limited size selections, and every try requires de-mounting the lens and re-mounting again.
Adding macro attachment lenses offers better control, but cheap singlet filters will degrade image quality and there is little that can be done to mitigate it. The size of the filter is also rather limited, making it hard to find fitting high quality attachments for telephoto lenses or ultra-fast lenses.
Reversing the lens is a lot of fun, but only lenses with shorter focal lengths are likely to work. Additionally, the lack of secure contact makes it only suitable for smaller lenses. Most adapters also does not cover the original mount with electric contacts, which makes lens control quite hard, or downright impossible for modern focus by wire lenses.
In general, the best way to do macro photography is always to get a dedicated macro lens. But if such investment appears too expensive or have very low return, i.e., it will not be used often, then with some sacrifices, it is also fine to perform a trick or two to get into the world of macro. Exactly which route to choose would depend on the kind of macro you want to do and the sacrifice you are willing to make.