Spectral Transmission of Unordinary Filters
Unlike film, whose spectral response vary greatly across different emulsions. The silicon based PDA under UVIR-cut have a relatively unified response pattern even among different camera brands, gone are the days when people use filters to select a certain band of wavelength in photography, such as infrared. The most common filters in still photography now are UV filters, whose primary function is not to filter certain wavelength, but to protect the lens…
After removing the UVIR cut glass in front of the sensor, a myriad of effects can be achieved by using filters that only accepts a certain range of wavelength. However, unlike an industrial optic product, who always offer a thorough bandpass graph and a detailed manual, the photographic companies are far less enthusiastic about revealing the spectral transmission data of their filters (or frankly, any technical info) (advertising scientific processes as mystic effects is the whole business for the photo market now), so here is a small investigation of the transmission of some of these filters.
Methodology
The primary instrument used here is a Sekonic C-800 spectrometer and a set of Godox flash.
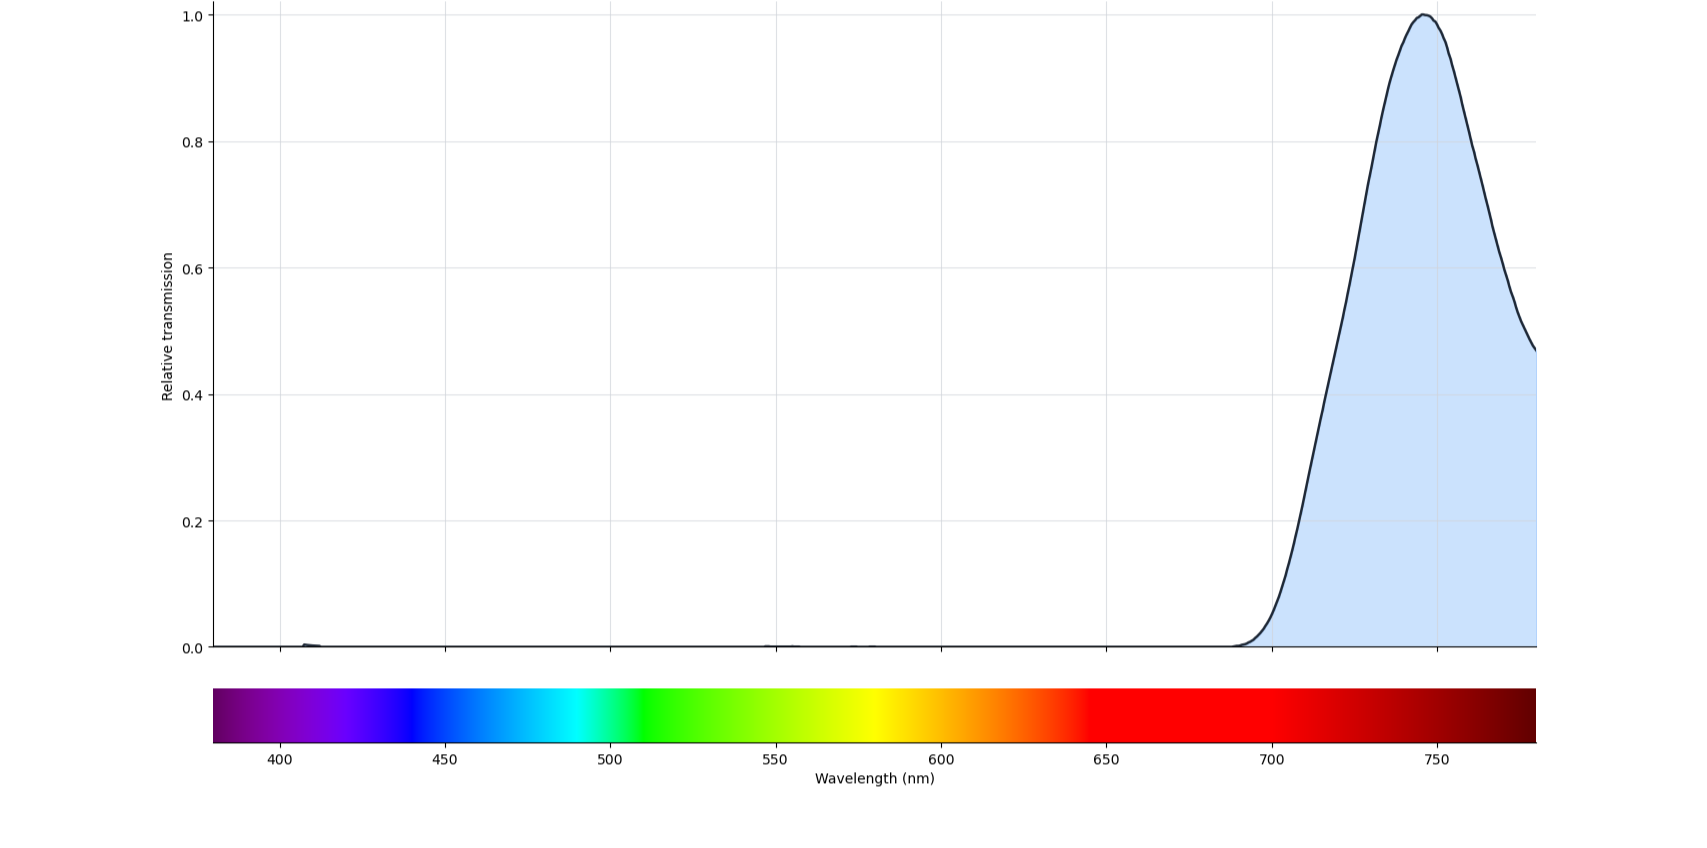
The C-800 is primarily a photographic and cinematographic tool, as such, the spectral data it offer only covers from 380nm to 780nm, barely over ultraviolet and infrared range. Additionally, Sekonic also made it so that the user cannot directly export the readout value, only graphs are supplied. An example graph is shown below, it is the spectral emission range of a flash light, which will also be served as the baseline for the calculation.
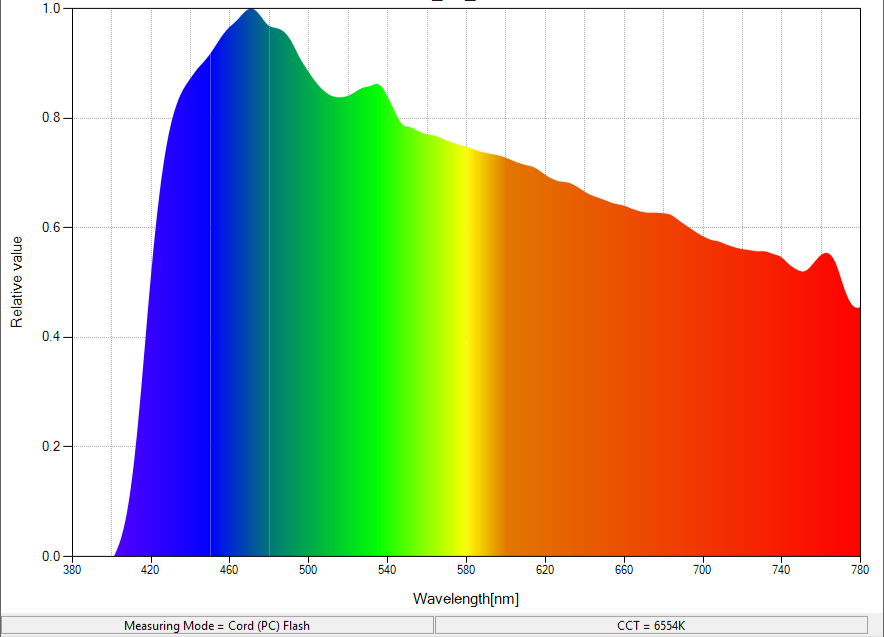
The image above also shows that, the spectral value from the C-800 is not measured in absolute intensity, rather, they are in relative values. This means that for the later results, they can at most represent a relative transmission ratio, not absolute transmission rate. For example, given a filter who lets in 25% of the 546nm light and 50% of 686nm and another filter that lets in 50% of 546nm and 100% of 686nm, their result would look identical.
Either way, a relative transmission is good enough, it can still be treated as an accurate measurement with an unknown scalar multiplier or behind some random but spectrally uniform ND filters. The way transmission is calculated is by metering the light source naked and then the same light source behind the filter. The graph is then converted into numerical values, followed by a division and then normalize the result.
For consistency, each filter was tested 3 times, with the light source placed at slightly different field angles (roughly 0-15 degrees). The spectral range of a filter (or the source) was acquired by averaging the three sets of data.
It should be emphasized that, because the source emission only starts at 400nm, everything below 400nm in the test results will be zero. It is entirely possible that the filters do let in wavelengths shorter than 400nm, but this experiment could not reflect that data due to the UV cutoff of the light source.
It might then be questioned as to why not do an outdoor experiment using the sun as the light source, the answer is simply safety and consistency. I did not find any outdoor place that is large and open enough to not introduce any obstructions, at the same time being an accessible private property to not have any trespassers that put the rather expensive and intricate setup in danger. As will be shown in later demo images, it is also hard to make sure the sunlight position and sky clearance remains consistent. The variations of outdoor environment are acceptable for demo images but unacceptable for numerical measurements.
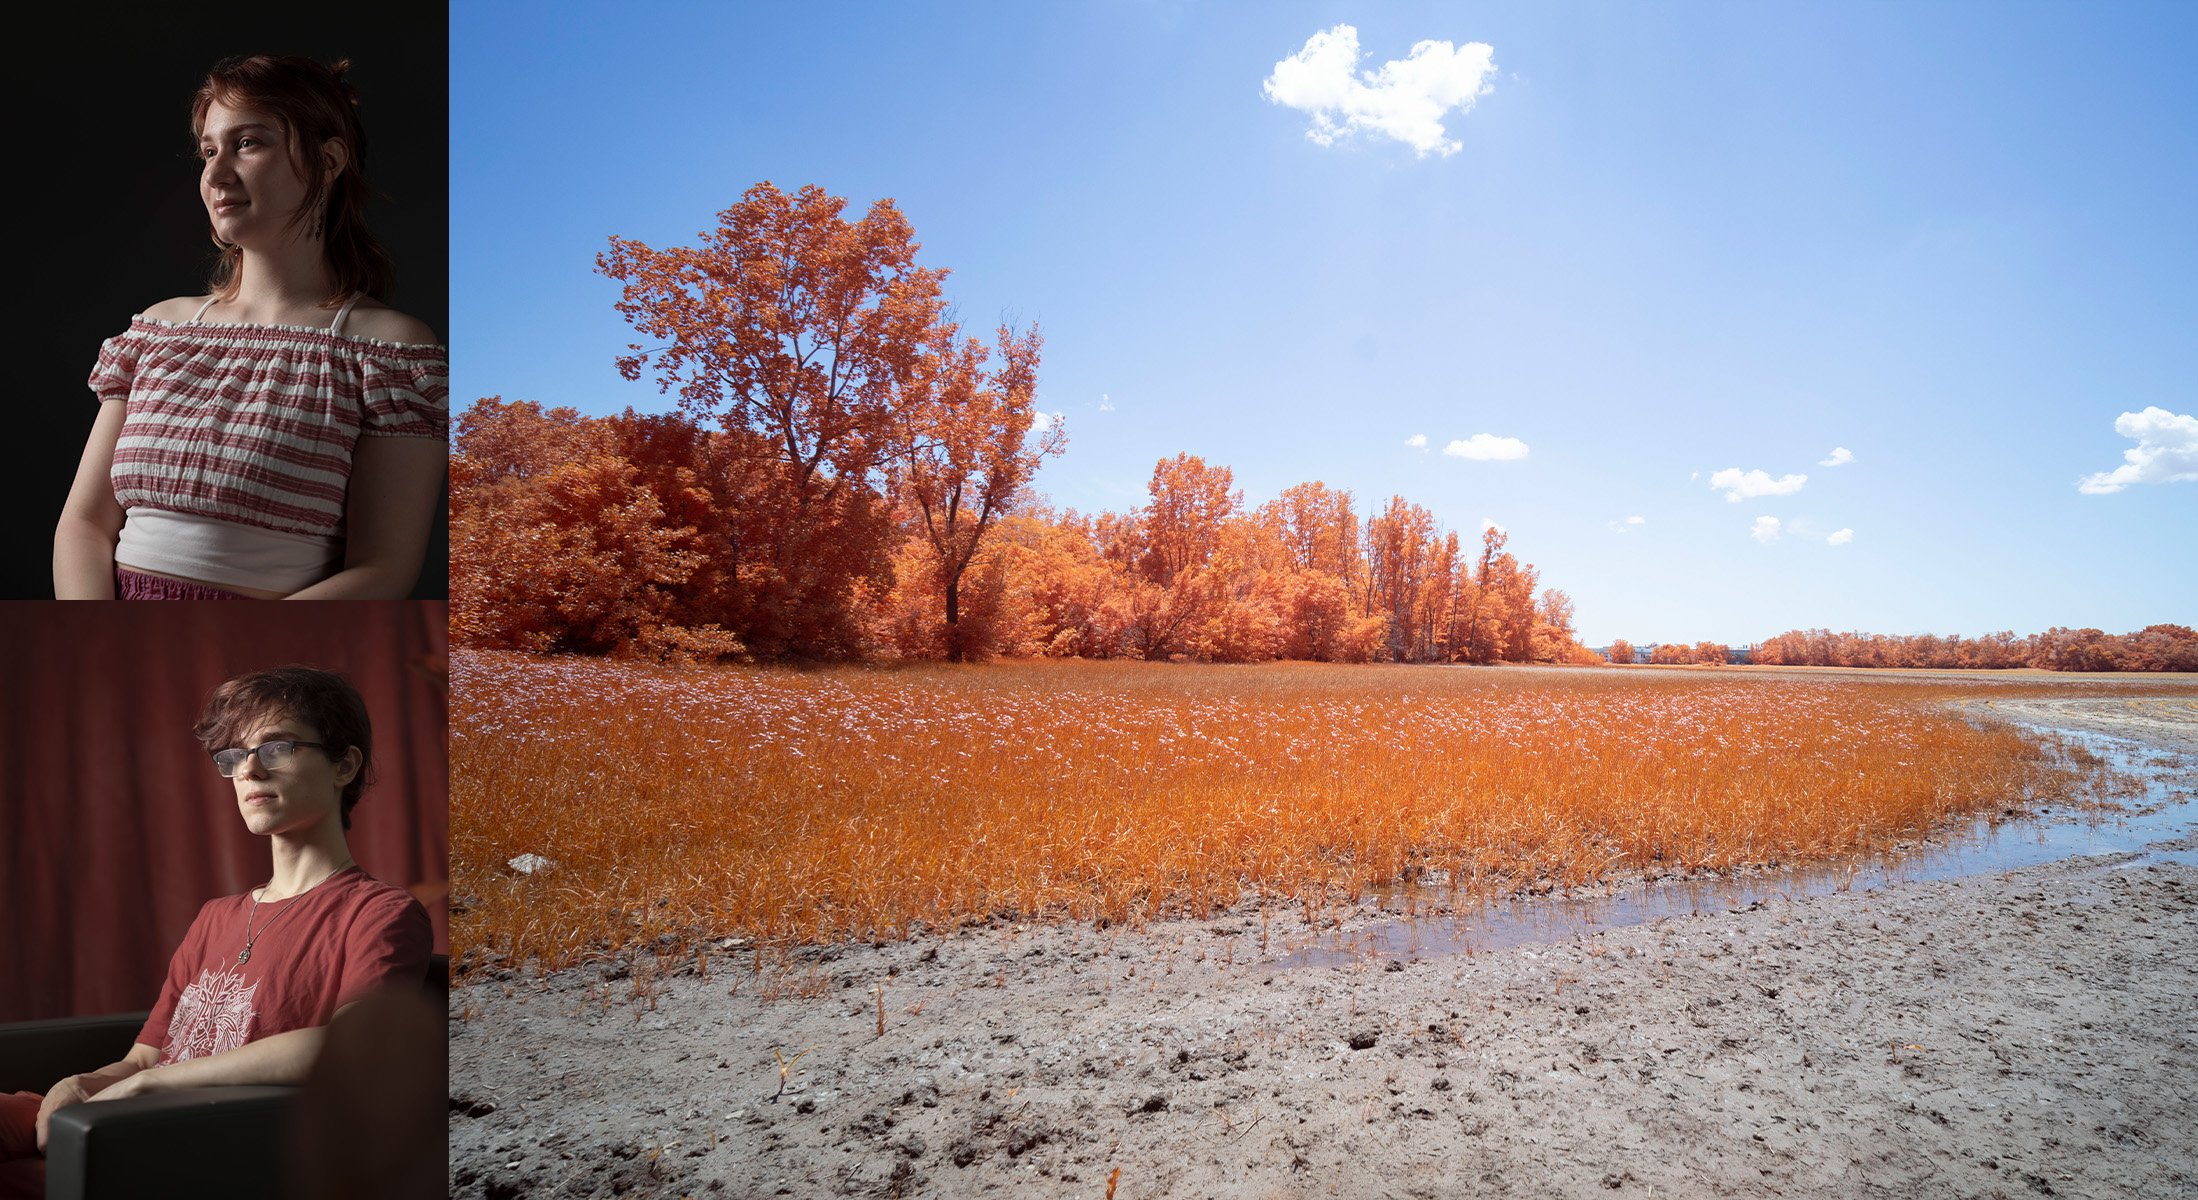
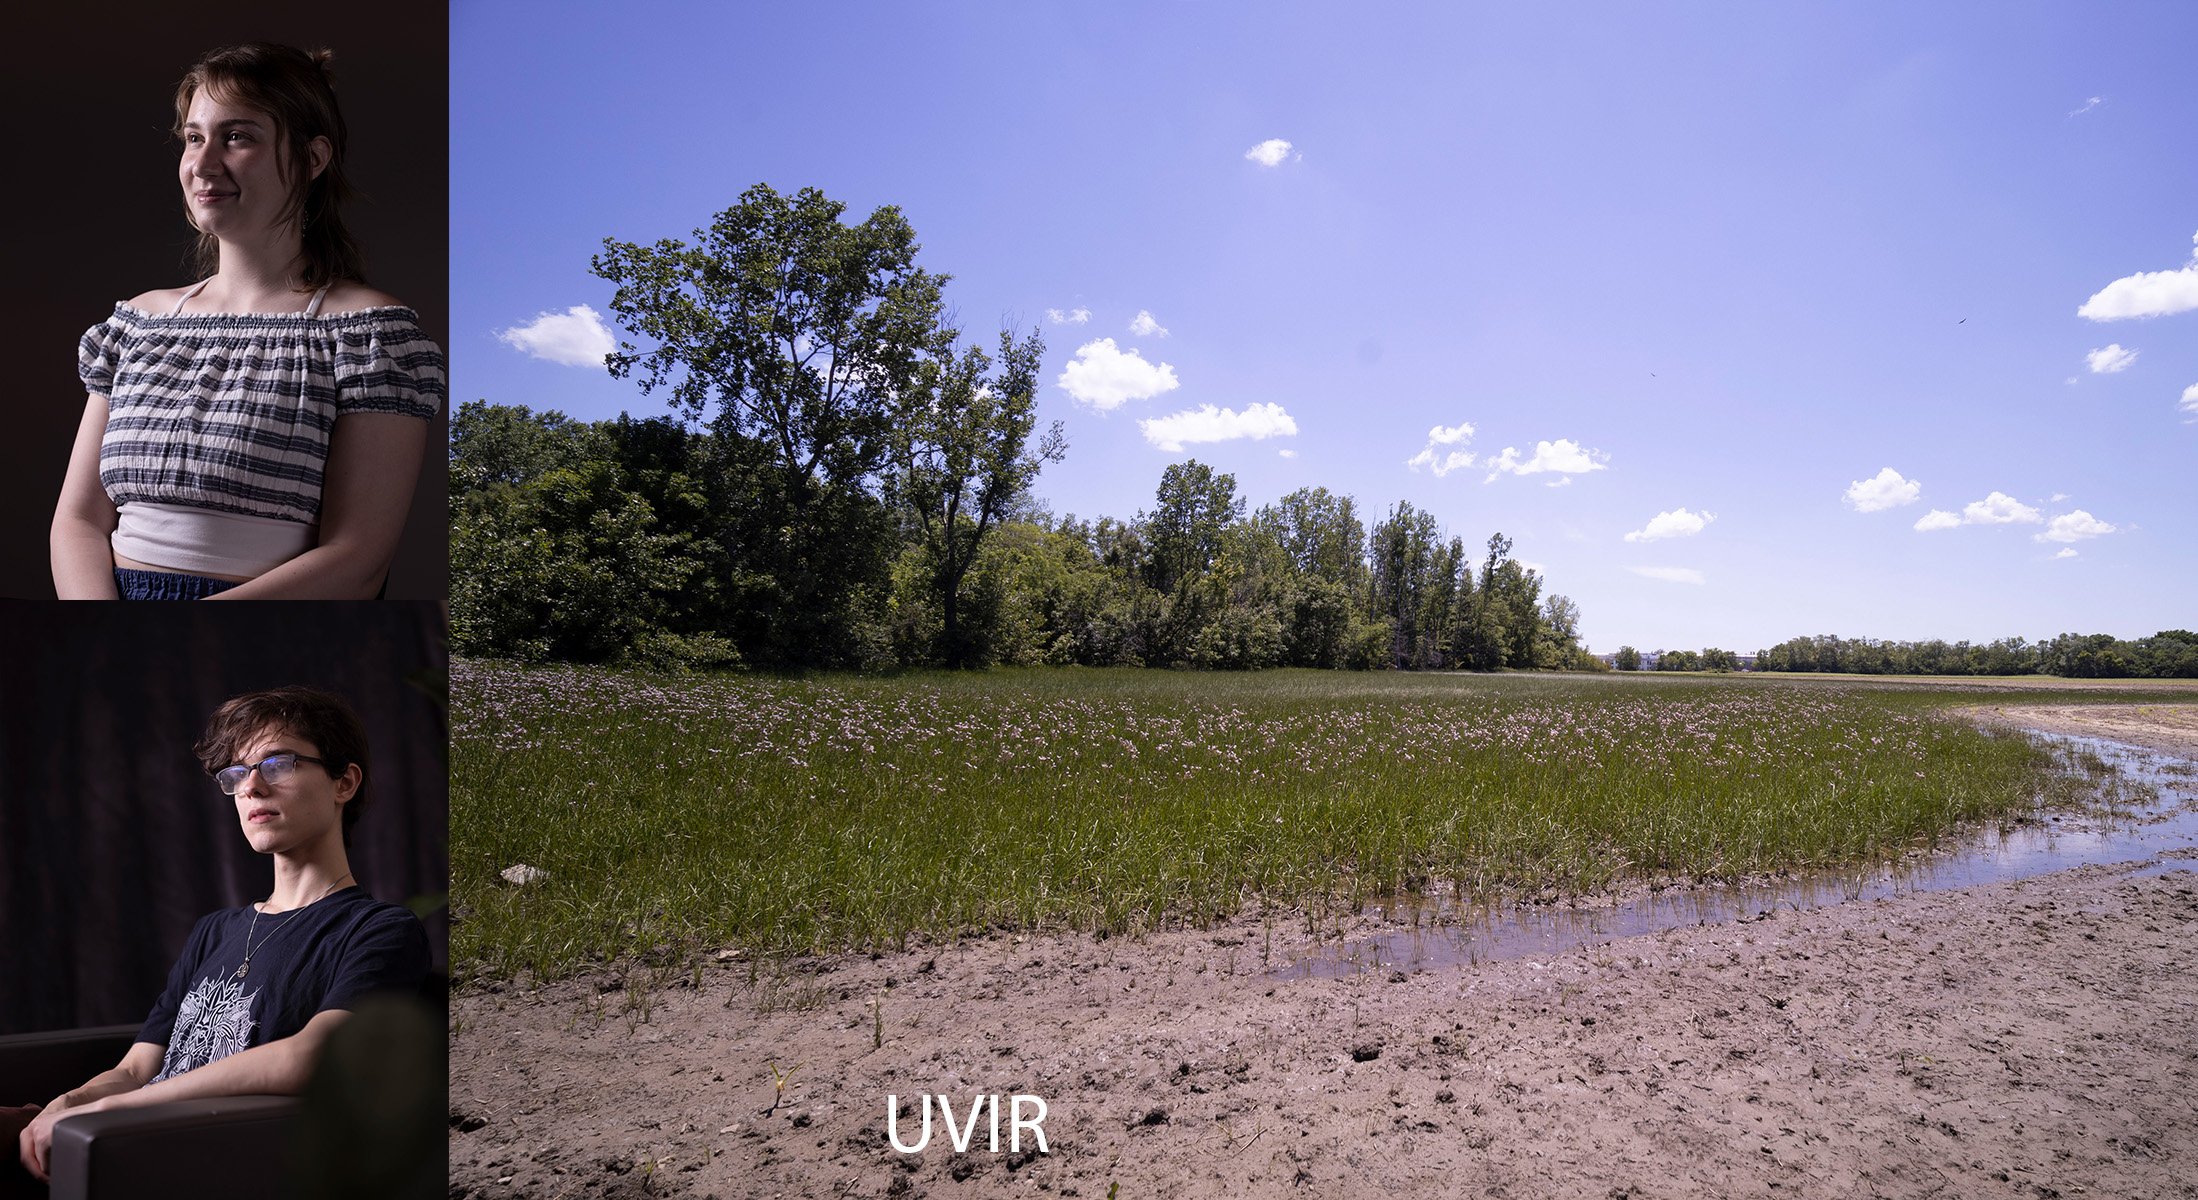
Mere graph is not very intuitive, so for a better visualization, another series of experiments were conducted. In each experiment, a scene was constructed (indoor lab) or selected (outdoor landscape); the filters were used one by one to shot the scene. Of course, for an ordinary camera with UVIR-cut still in place, these filters would be more or less useless, so the camera used in these experiments was an EOS R with the UVIR-cut already removed. For human subjects, the set up is a lab environment using the aforementioned flash as the light source; the lens is a Tamron AdaptAll 2 52B 90mm f/2.5 at f/4. For the outdoor scene, the lens is a Venus Laowa 14mm f/4 (M mount version adapted onto RF mount). A Spyder color checker was used to acquire a baseline color temperature and tint, a setting that was then applied for all the images created using the filter.
Please note that due to the cosine falloff and exit pupil position, the outdoor scene with the Laowa lens has a more pronounced vignette and possible red-shift around the corner.
Acknowledgements
This experiment would not have been made possible without the help from many people.
Special thanks to Michael Hesmond for lending me his Sekonic C-800 and booking the lab space.
My gratitude also goes to the models who were willing to sit still full-frontal-ing bright Xeon gas explosions for half an hour.
Results
In this section the calculated spectral transmission results will be shown. To make it more intuitive, a set of photographic images using the filter is also shown. The photographic images are taken using a Canon EOS R that has received a UVIR removal.
Because some of the filter source company might be very unhappy seeing these results, no specific names are mentioned. However, seasoned IR photographers might be able to realize which filter it is by context and the example images.
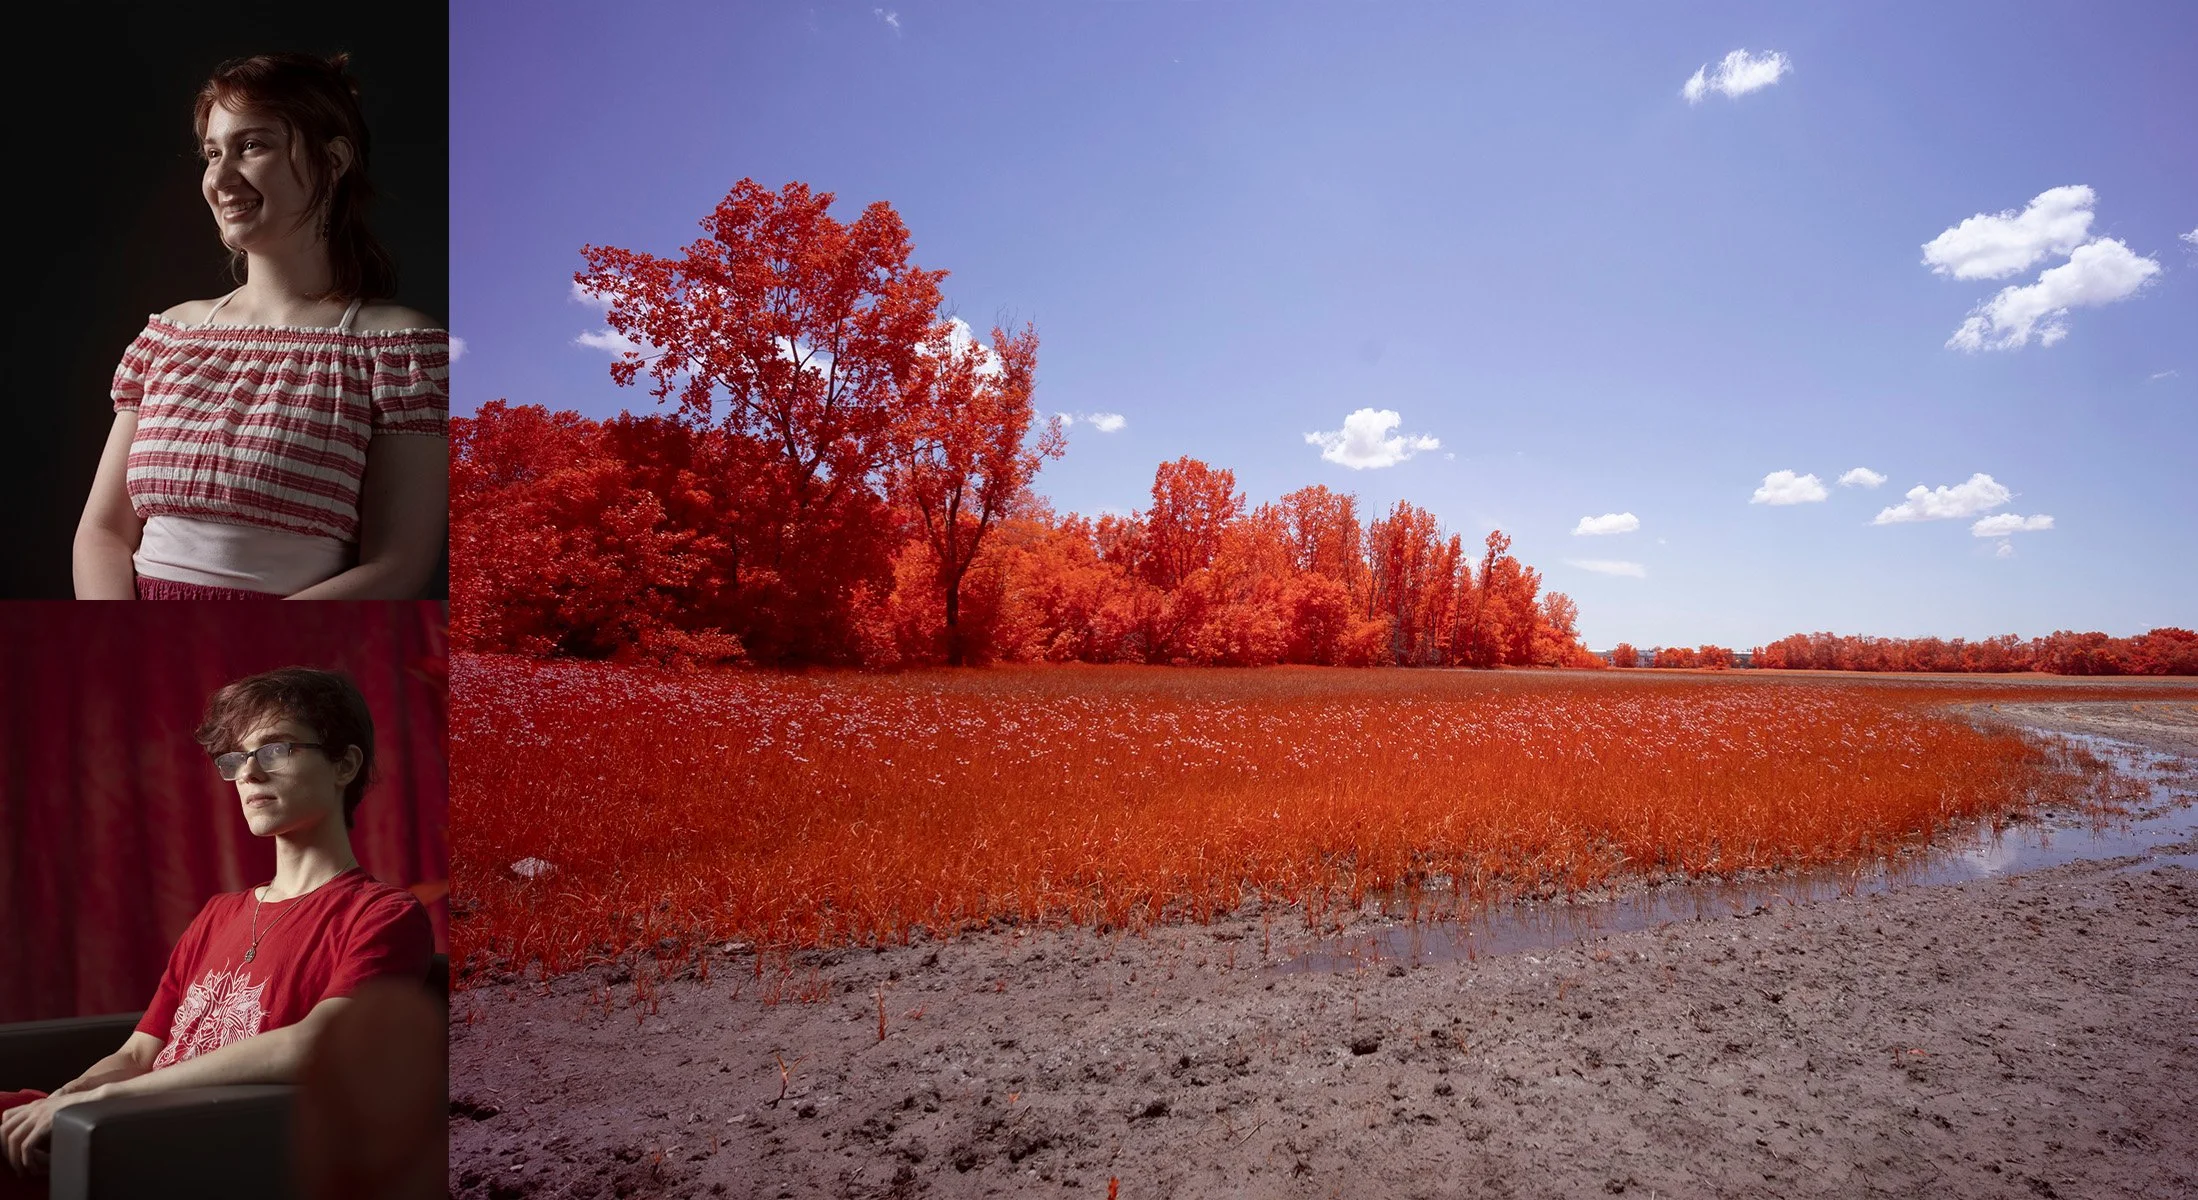
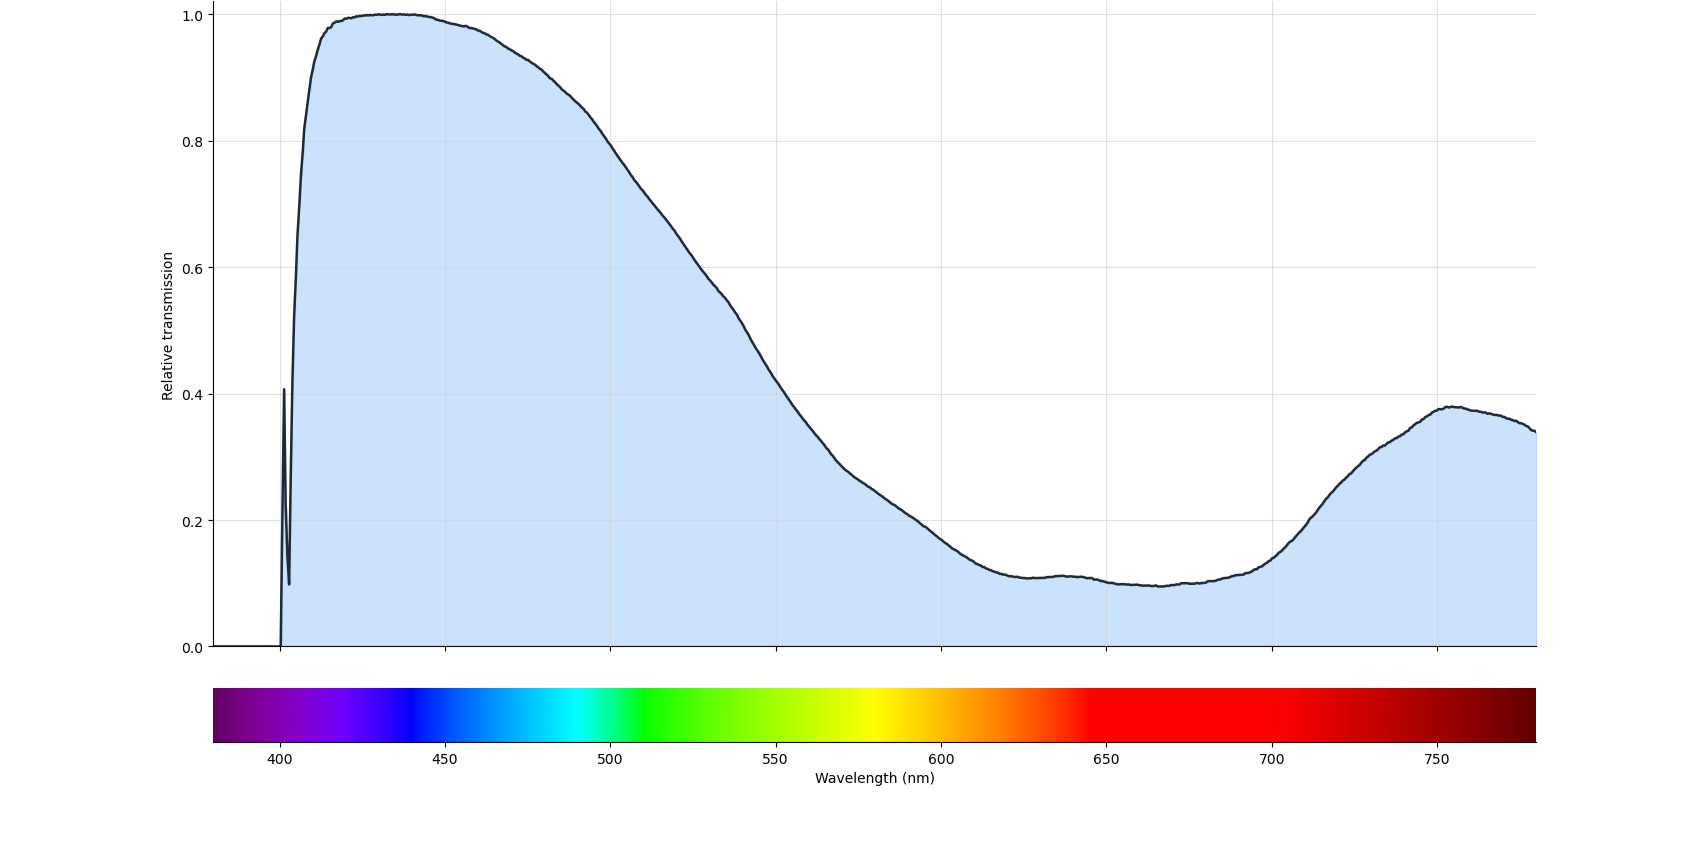
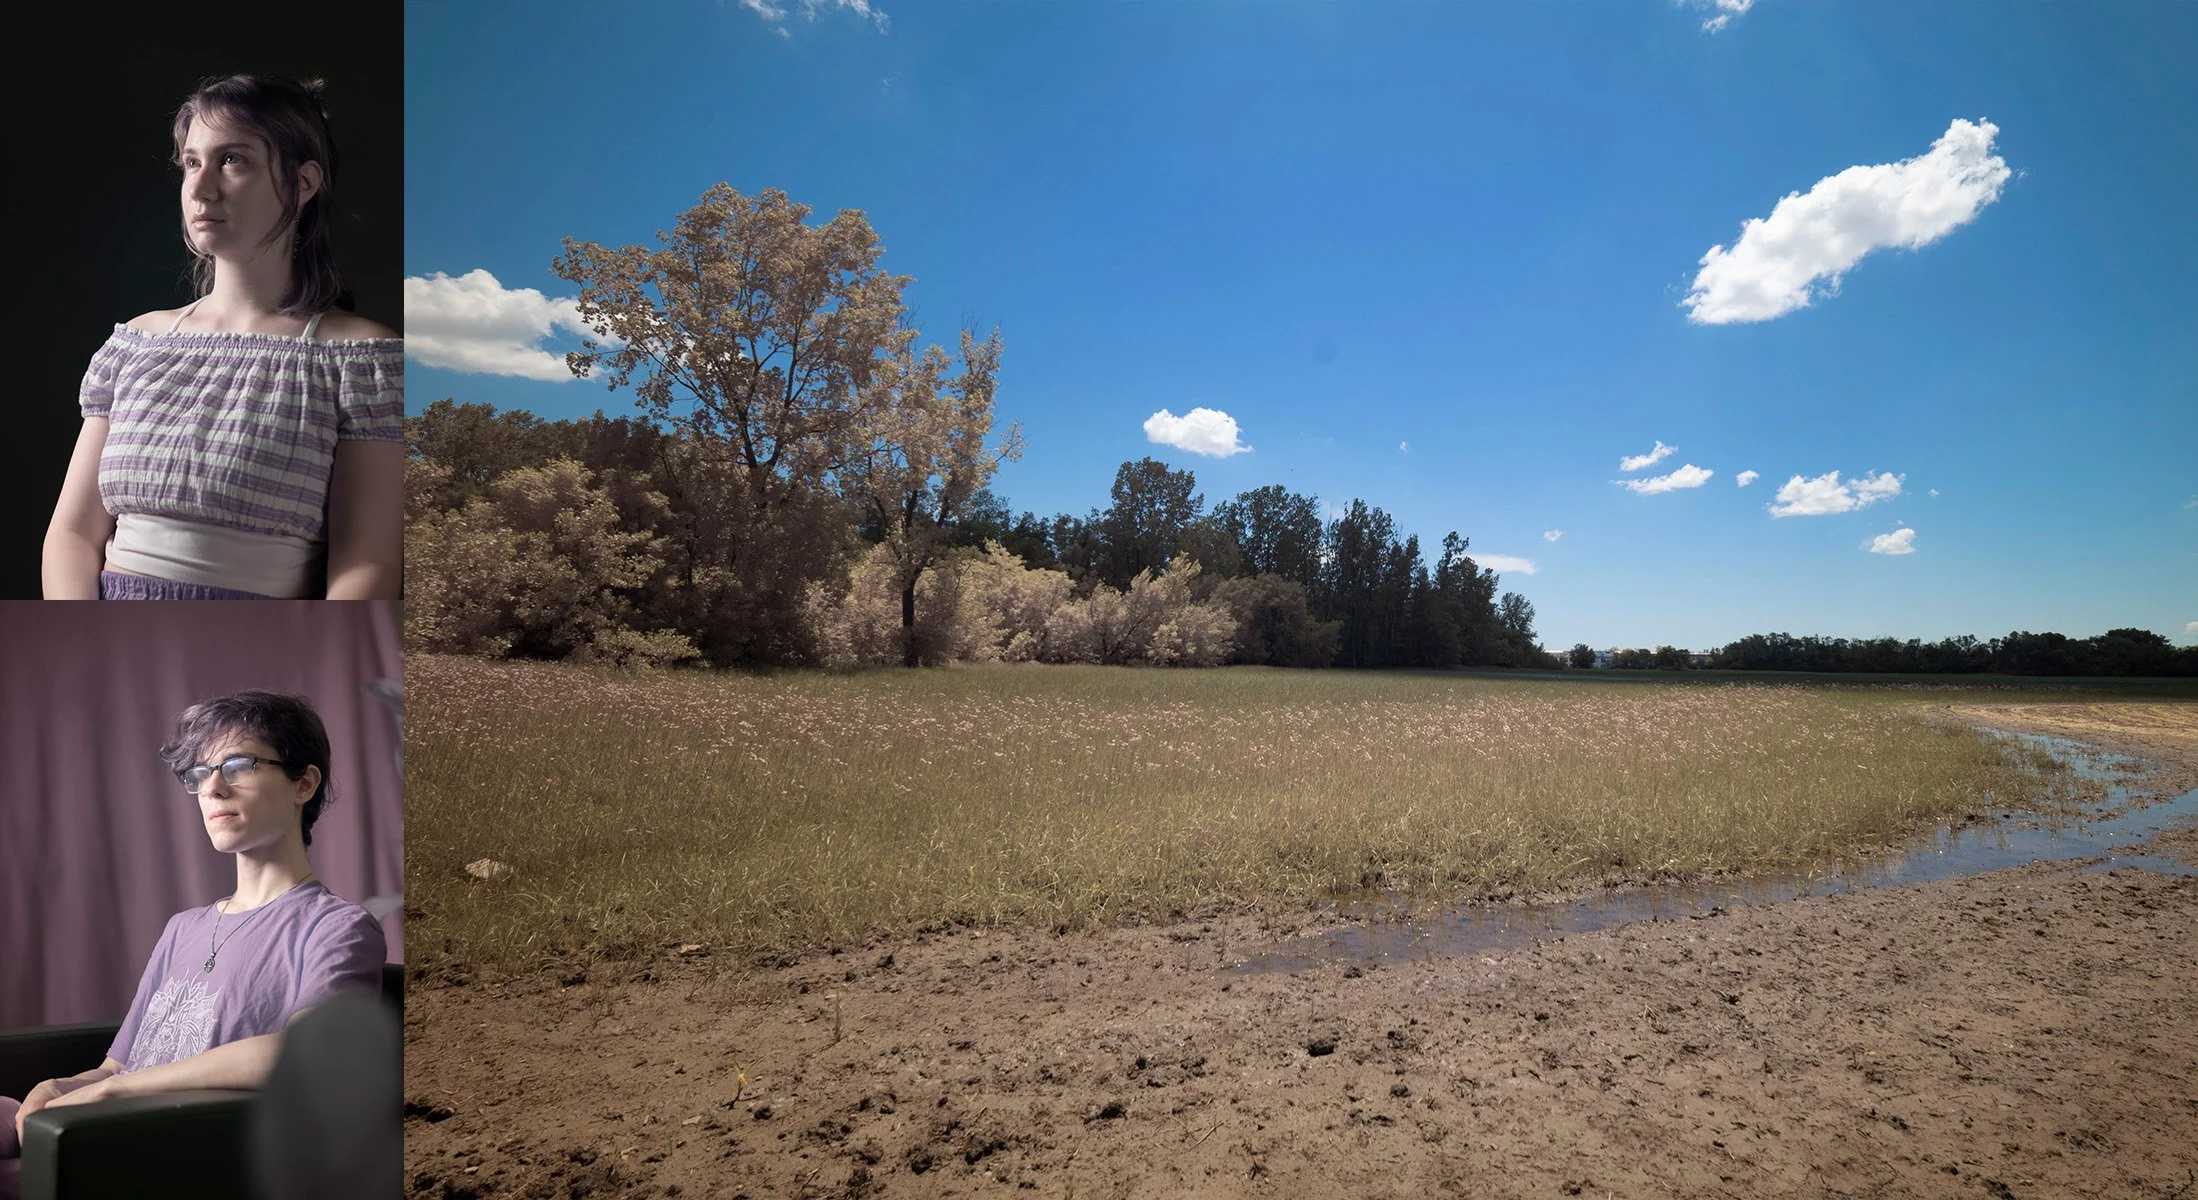
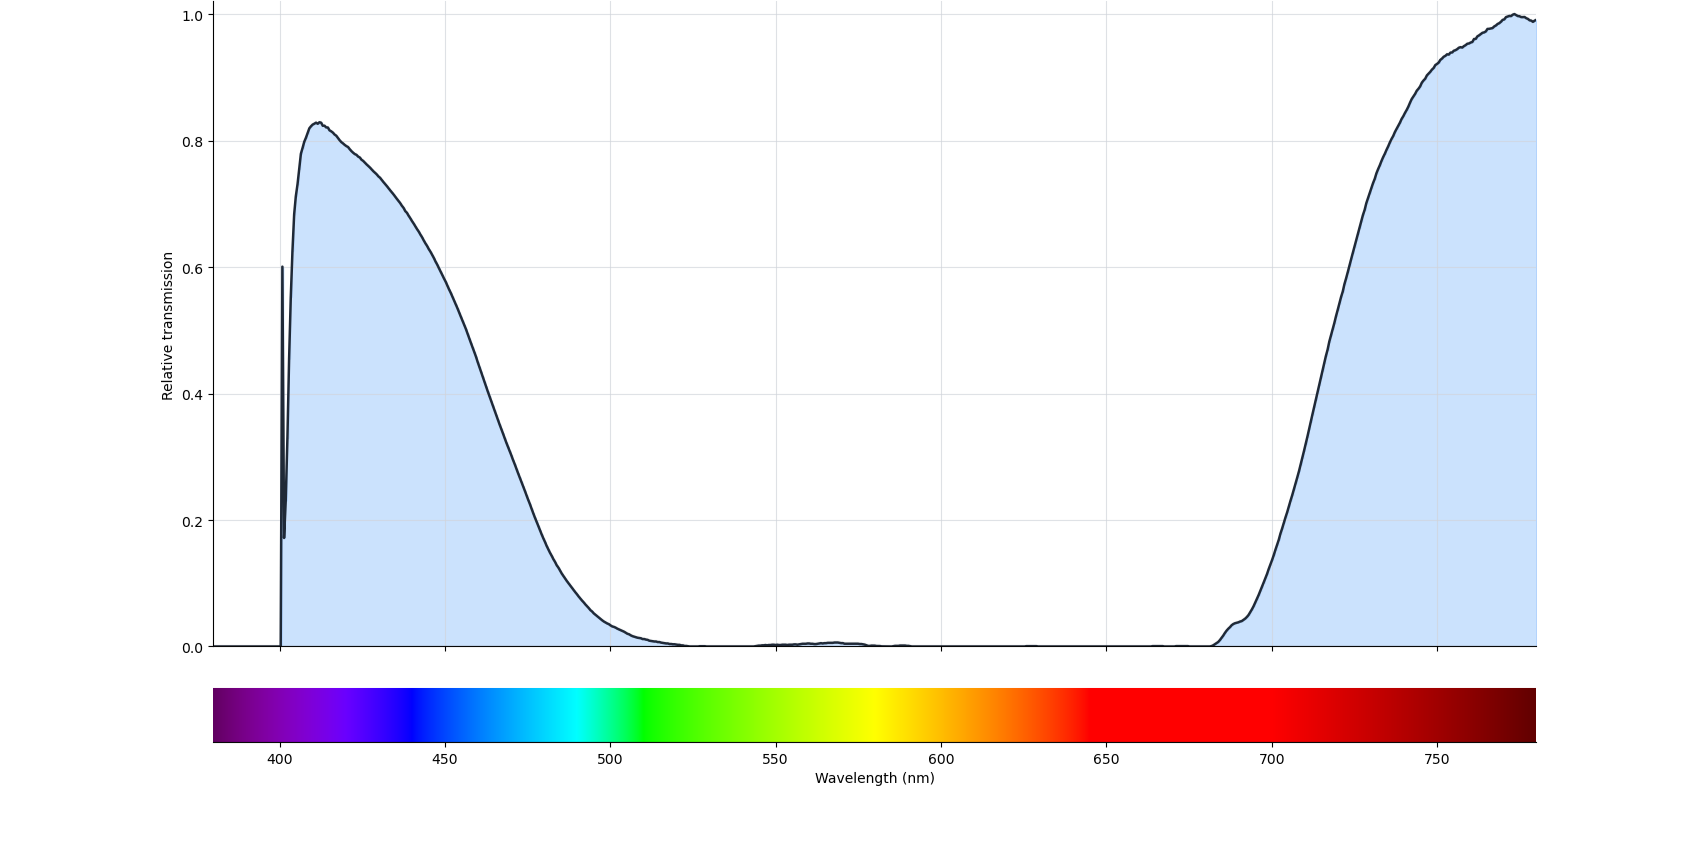
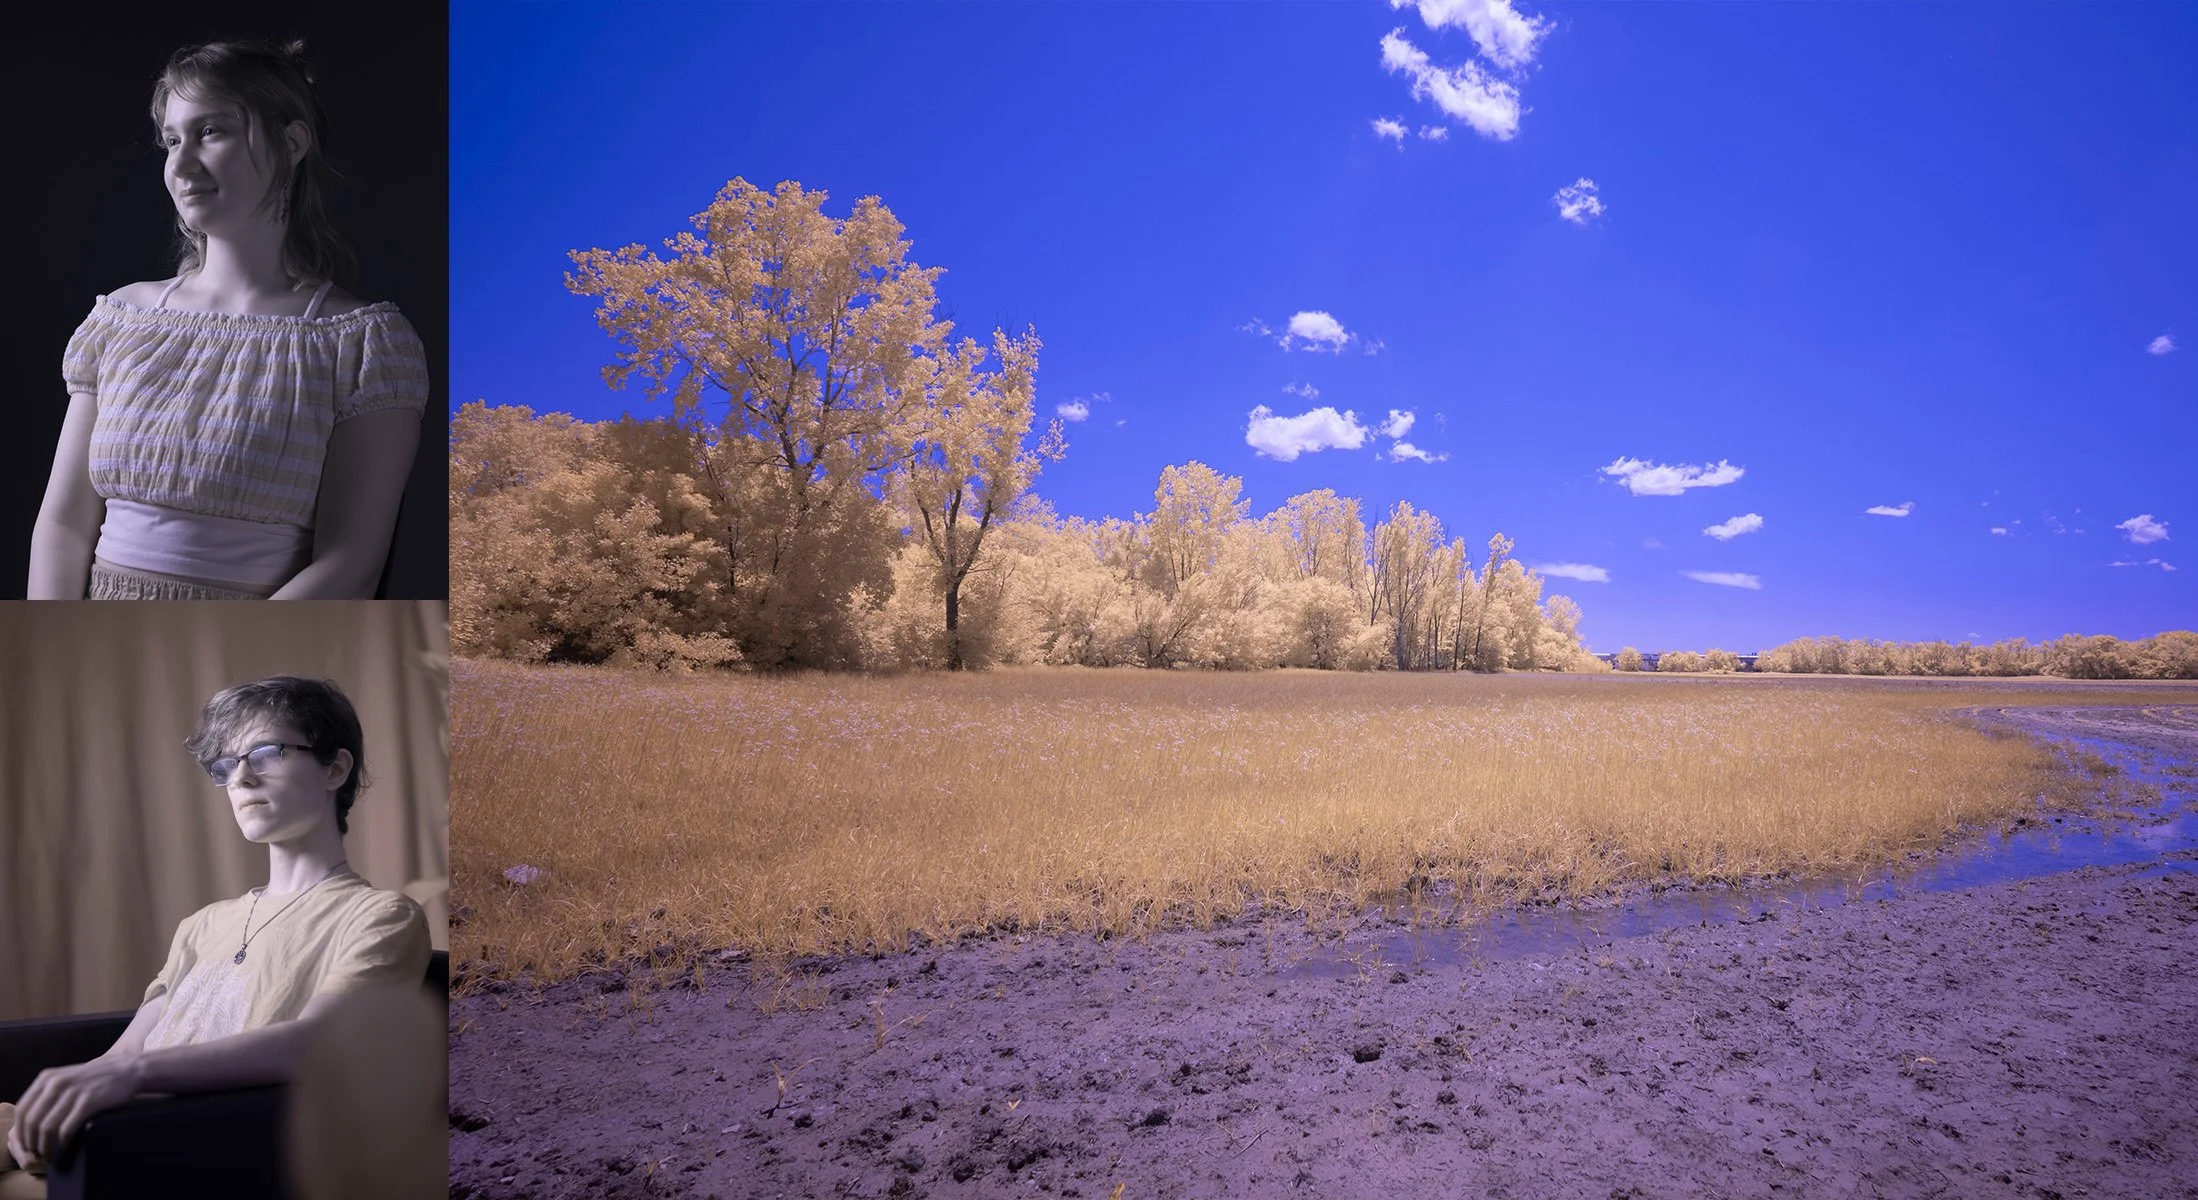
Aerochrome Imitator #1
This is a popular commercial filter that, when used on a full-spectrum camera, produce results that looks like the Kodak Aerochrome film.
C-800 gave a CCT readout of 50000K, and white balance using the color checker gives a reading of 14750/-19 (white balance/tint).
Example image of human subject and landscape are shown below. Again, aside from applying the color temperature and tint setting, plus minor exposure consistency control, no other edits were done to these images (which I owe the models an apology).
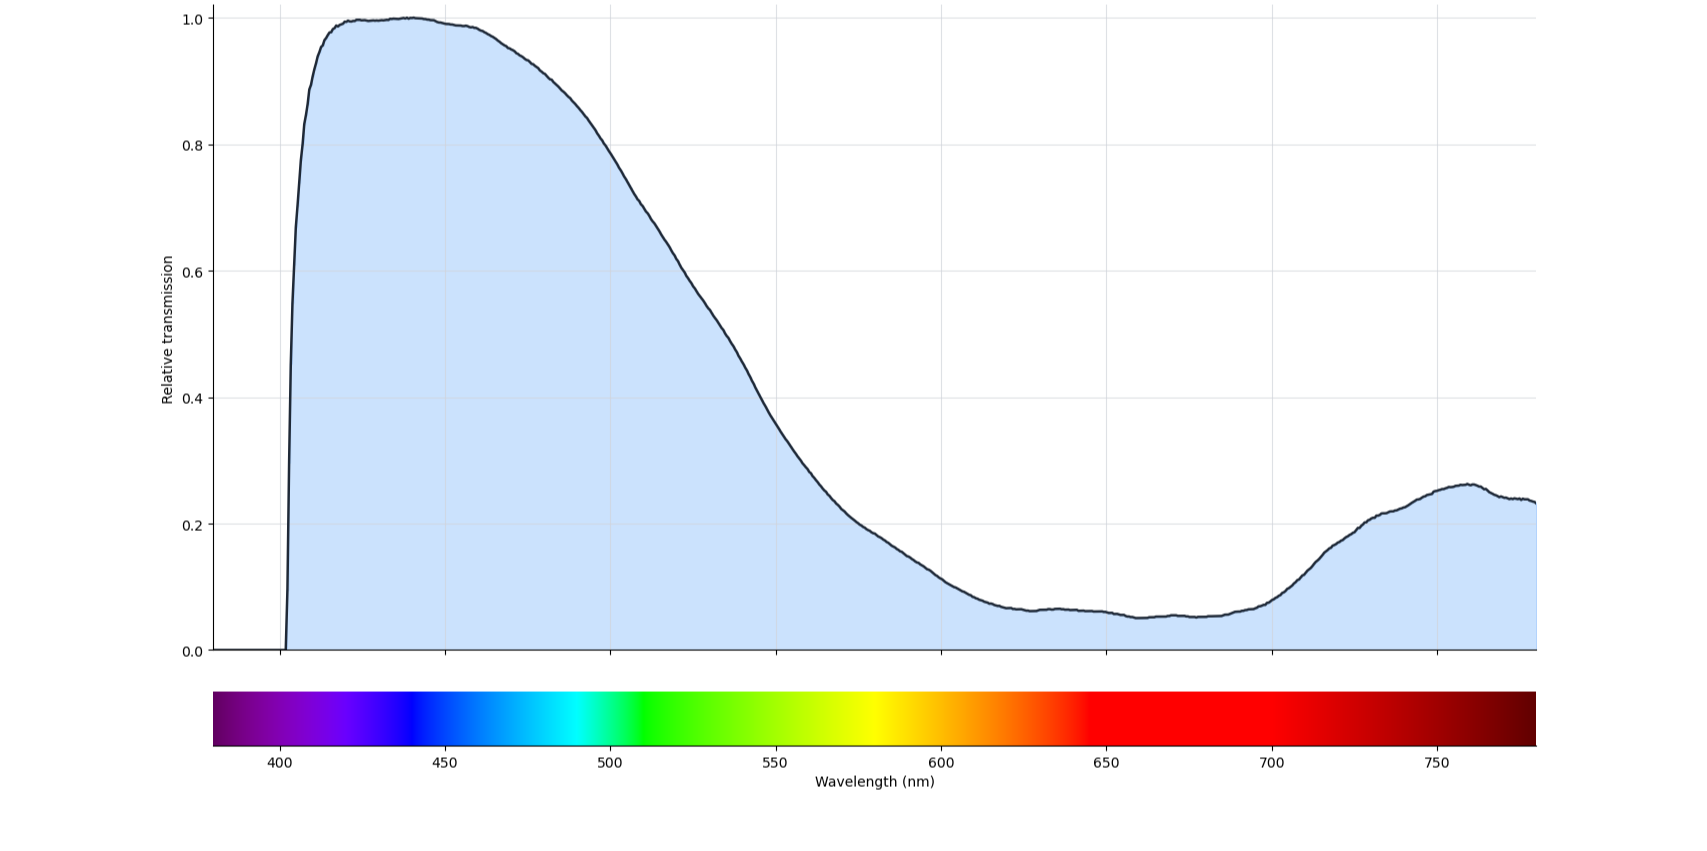
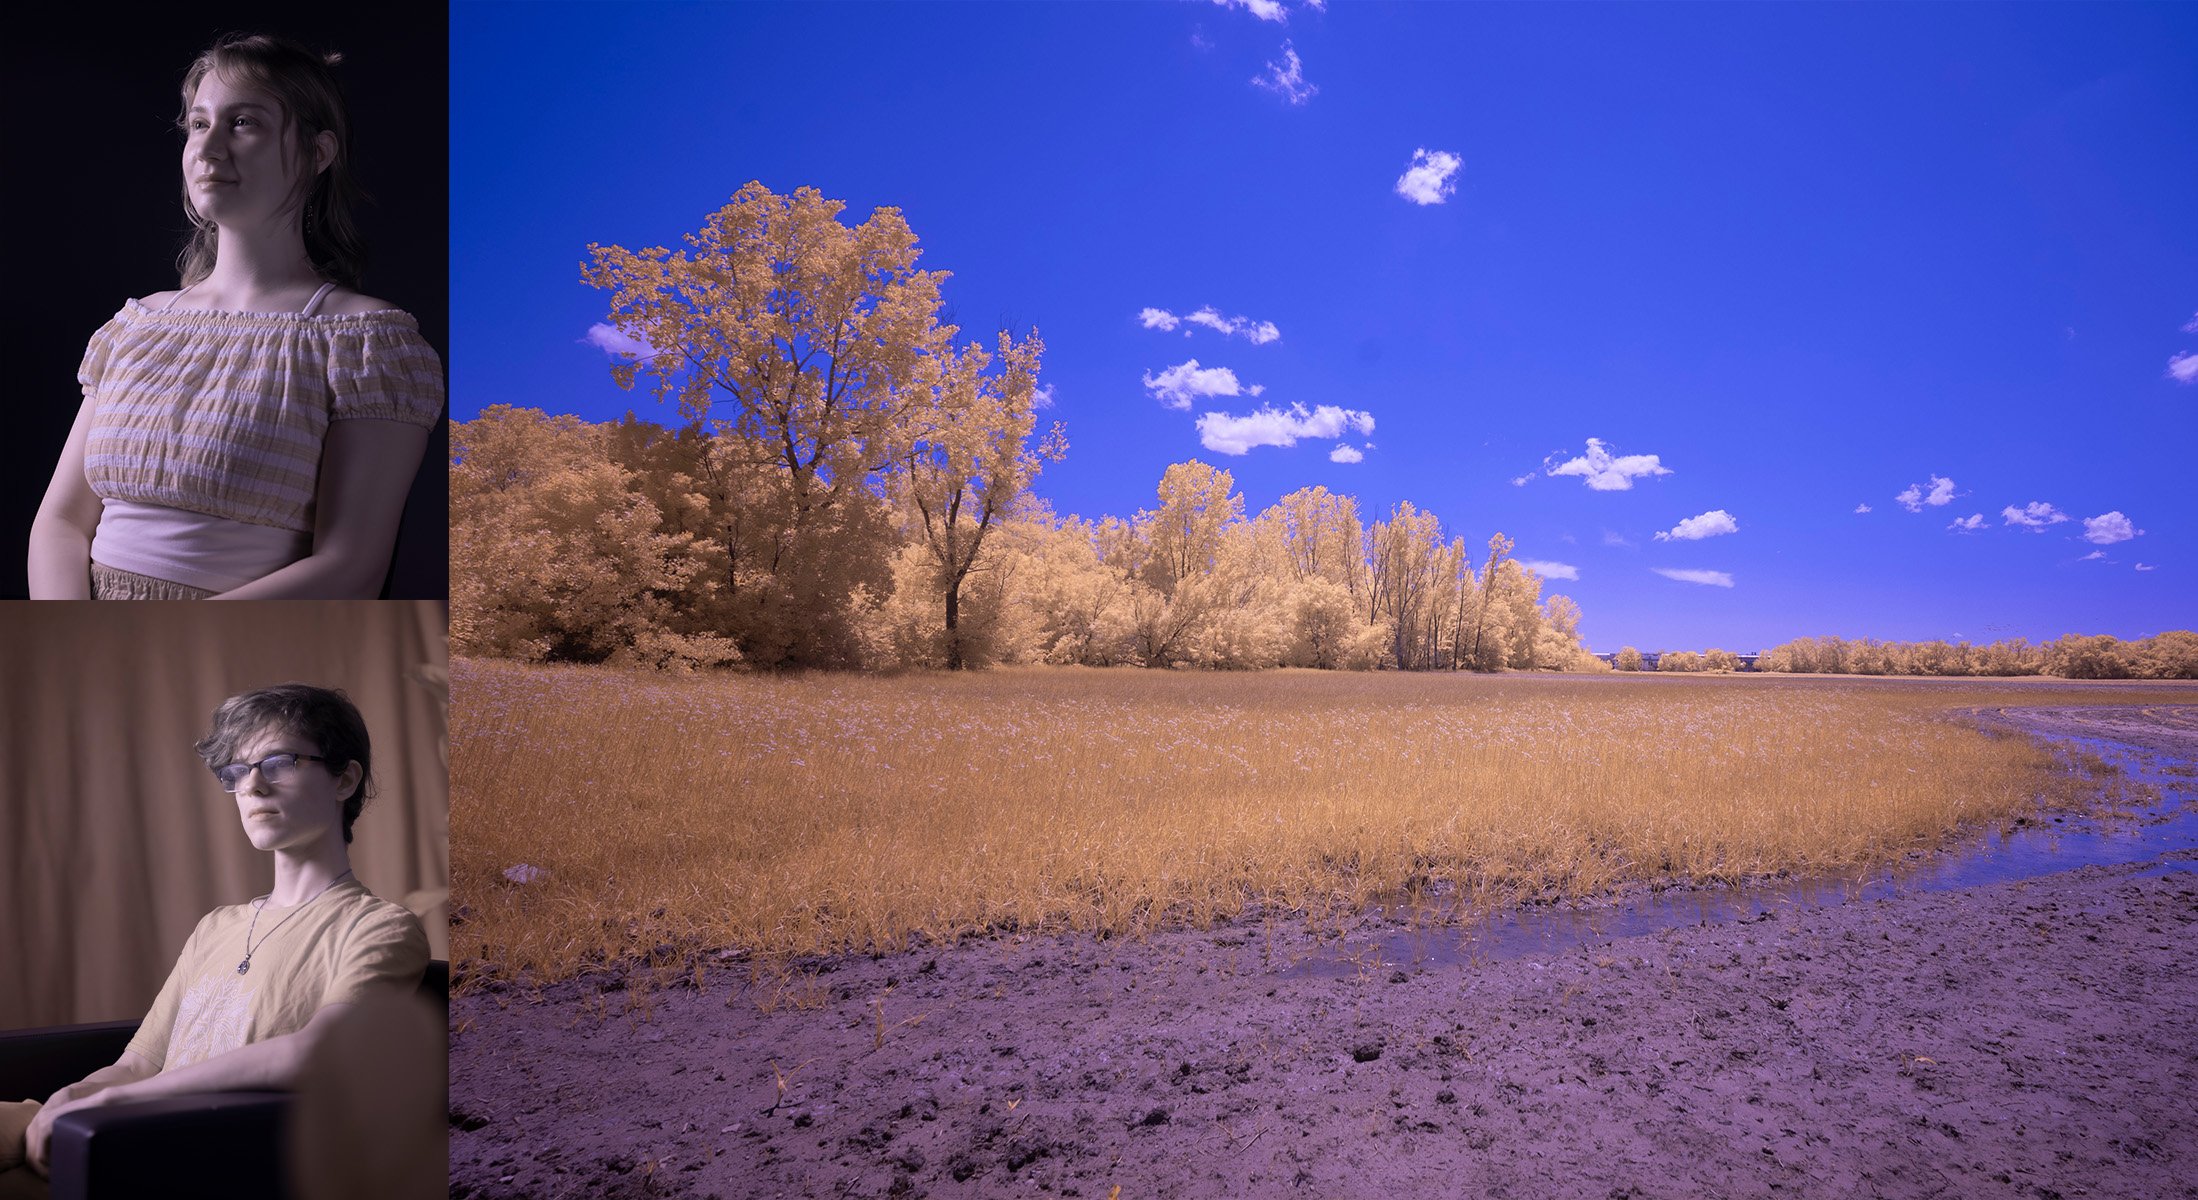
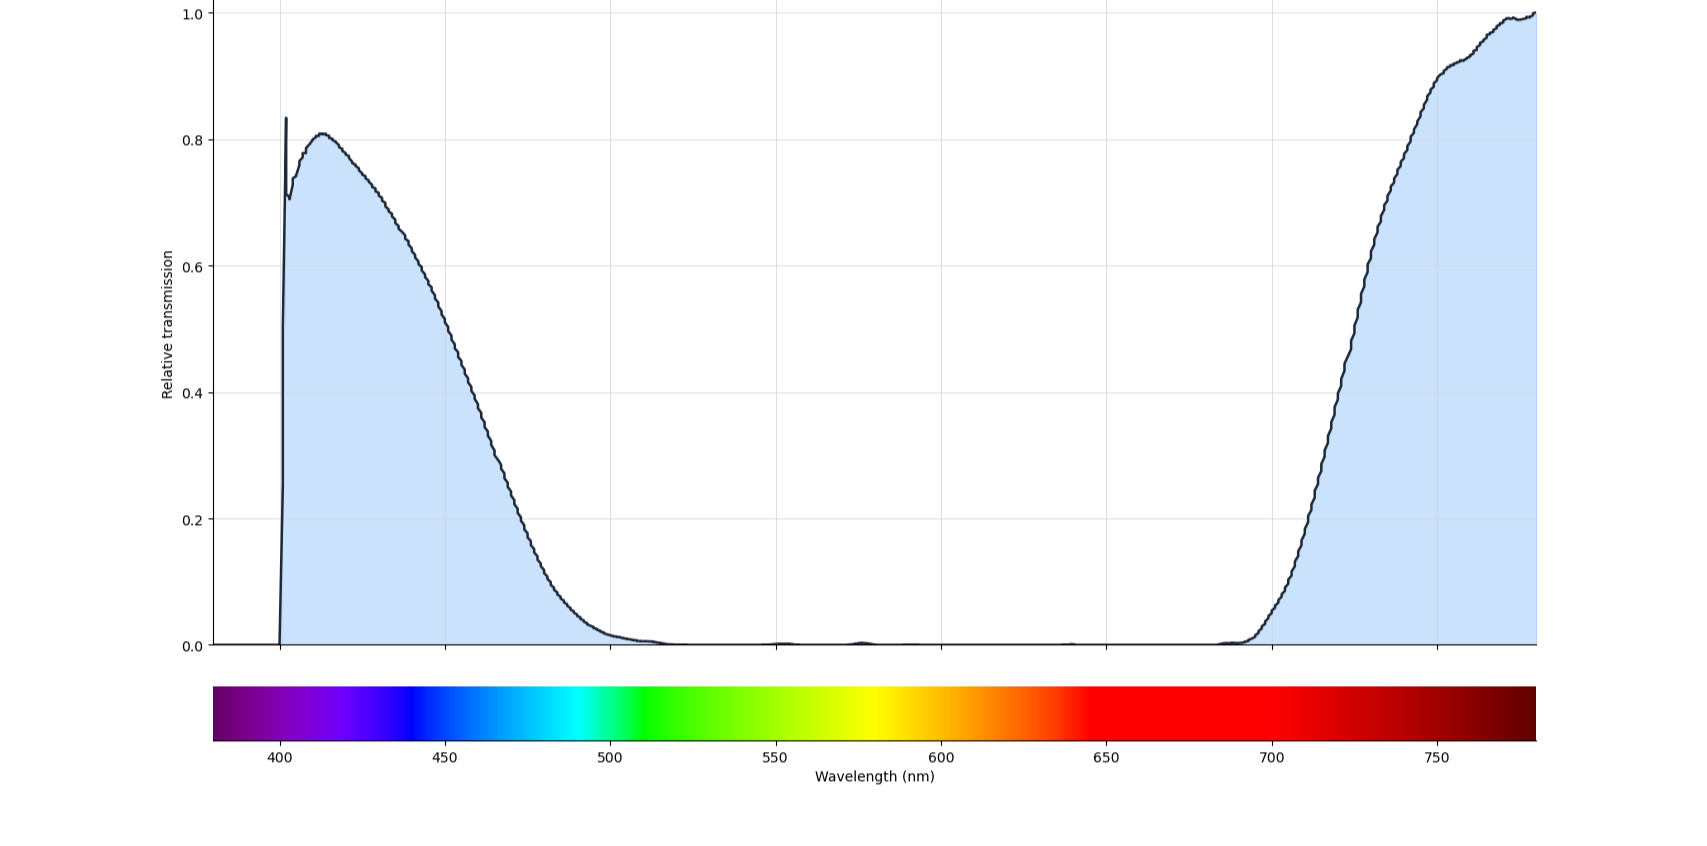
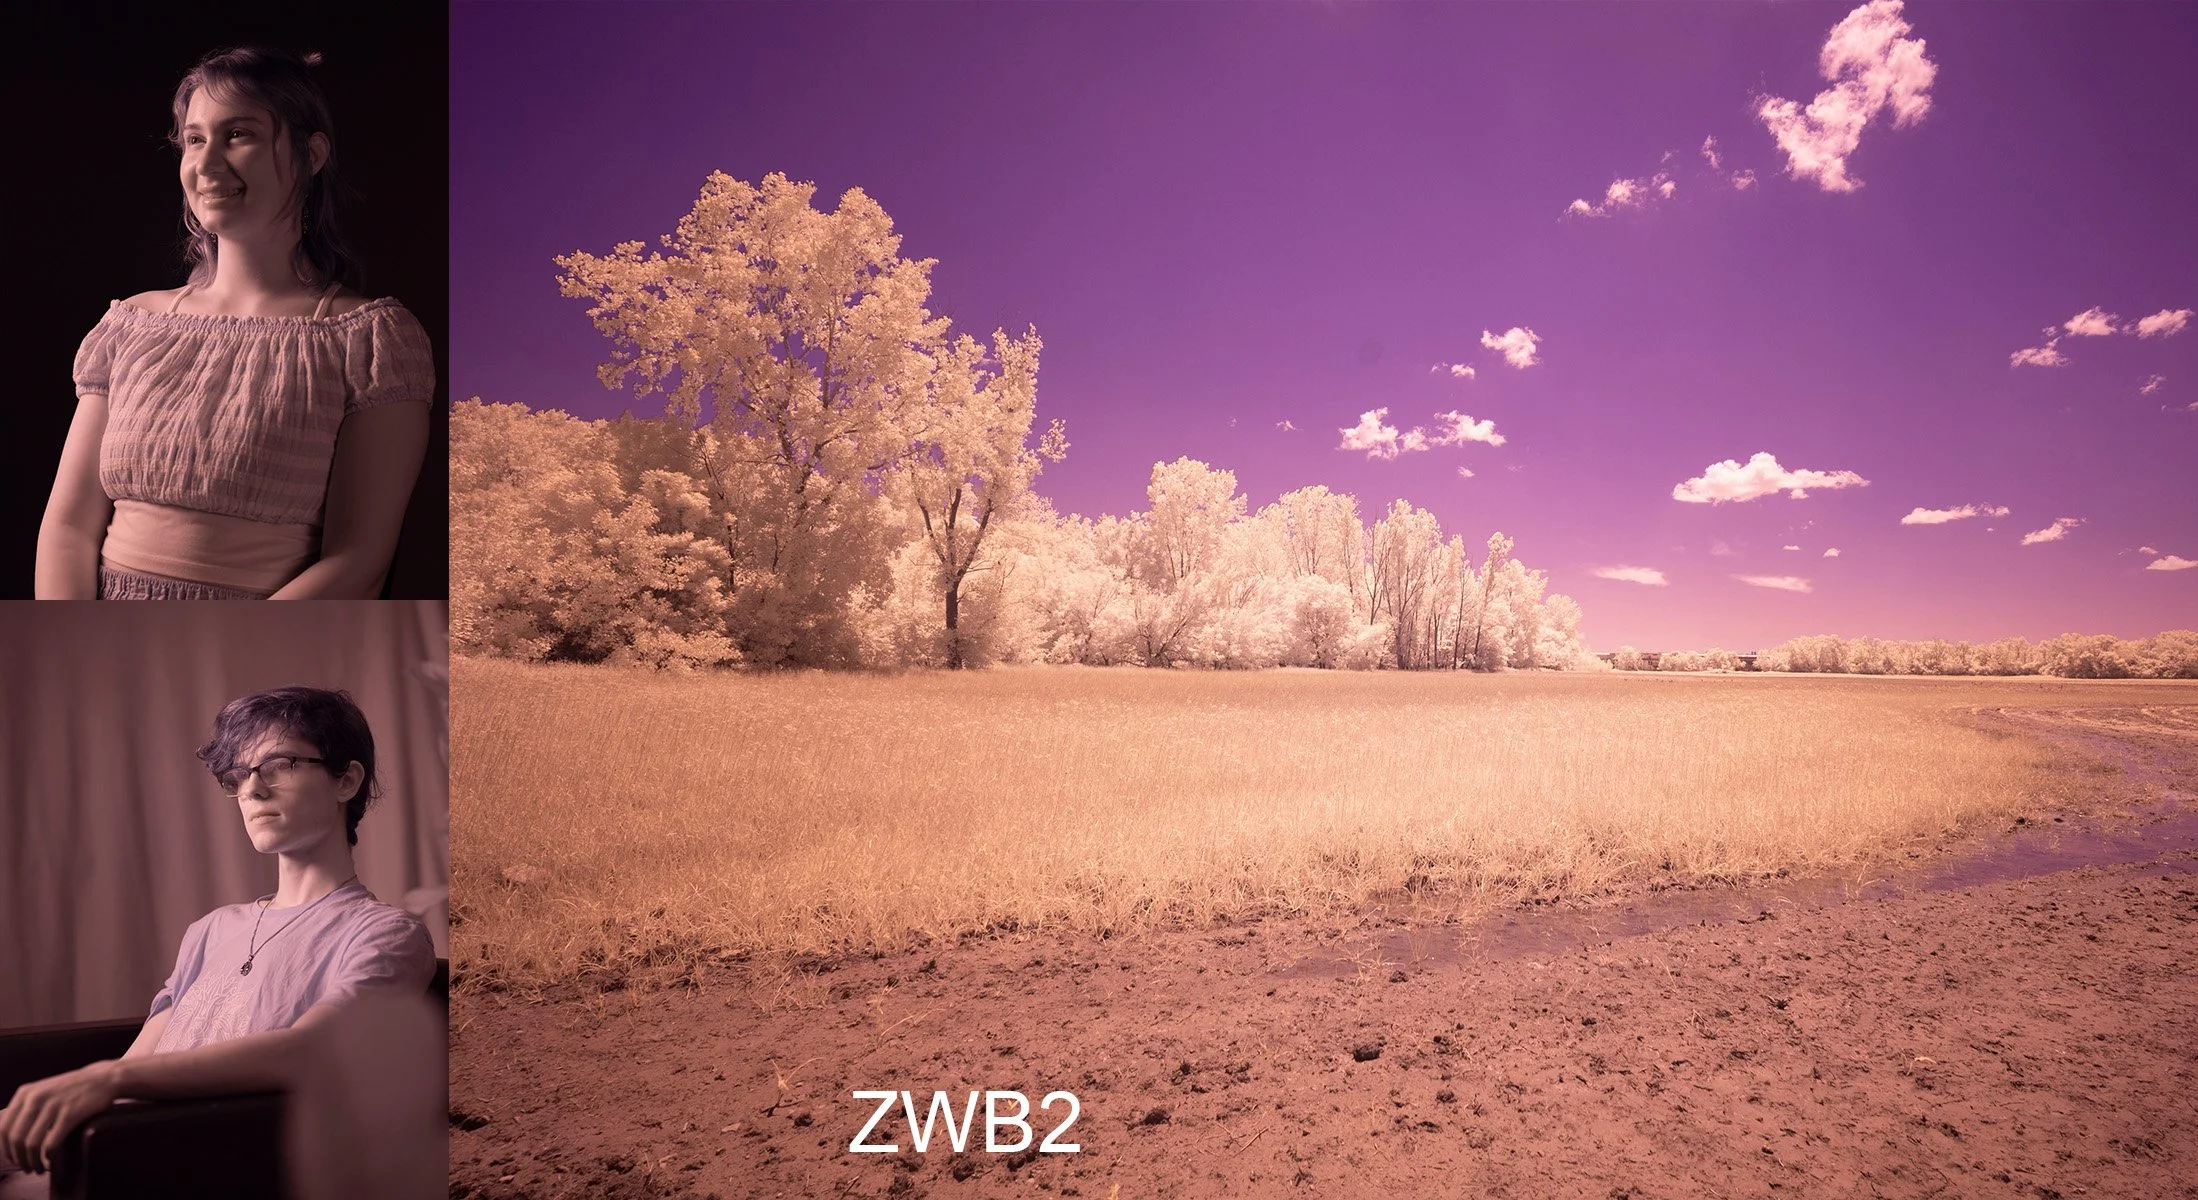
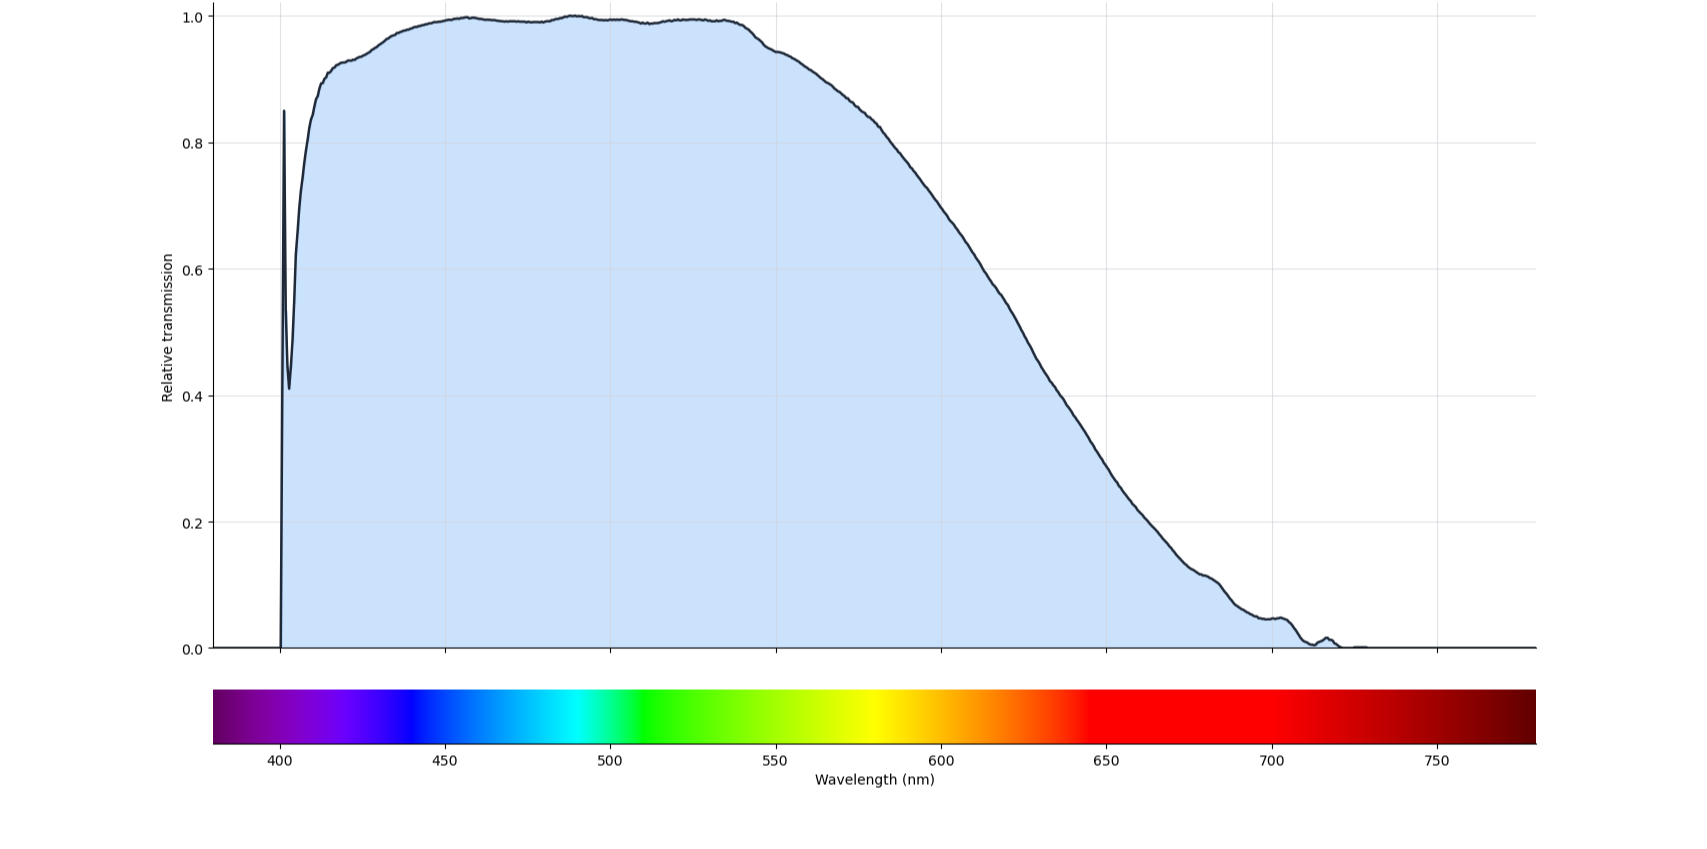
Aerochrome Imitator #2
This is the sibling version of the previous filter, but it was made thinner to accommodate some specific use conditions.
Rather interestingly, this thinner filter has a higher band reject at the visible red range. This filter also has a stronger transmission around the green range, in fact, it peaks at the cyan-green color. It should also be pointed out that the small upheaval near 400nm is caused by small denominator as the source emission only starts around that wavelength. Since it is not a logical error, I left most of them unchanged.
C-800 gave a CCT readout of the same 50000K; white balance using the color checker gives a reading of 36000/129.
The higher rejection at the yellow-red region seems to have fed the sensor with purer infrared, I am also left with a suspicion that this filter has a higher IR pass, too bad C-800 does not allow me to poke at the NIR region.
Possibly due to it being a rear filter, the optical path difference introduced coupled with the recessed exit pupil position have created a much more obvious redshift. It should be fair to expect a better performance from this filter if the taking lens is more telecentric or the user is rich enough to afford a large diameter front version.
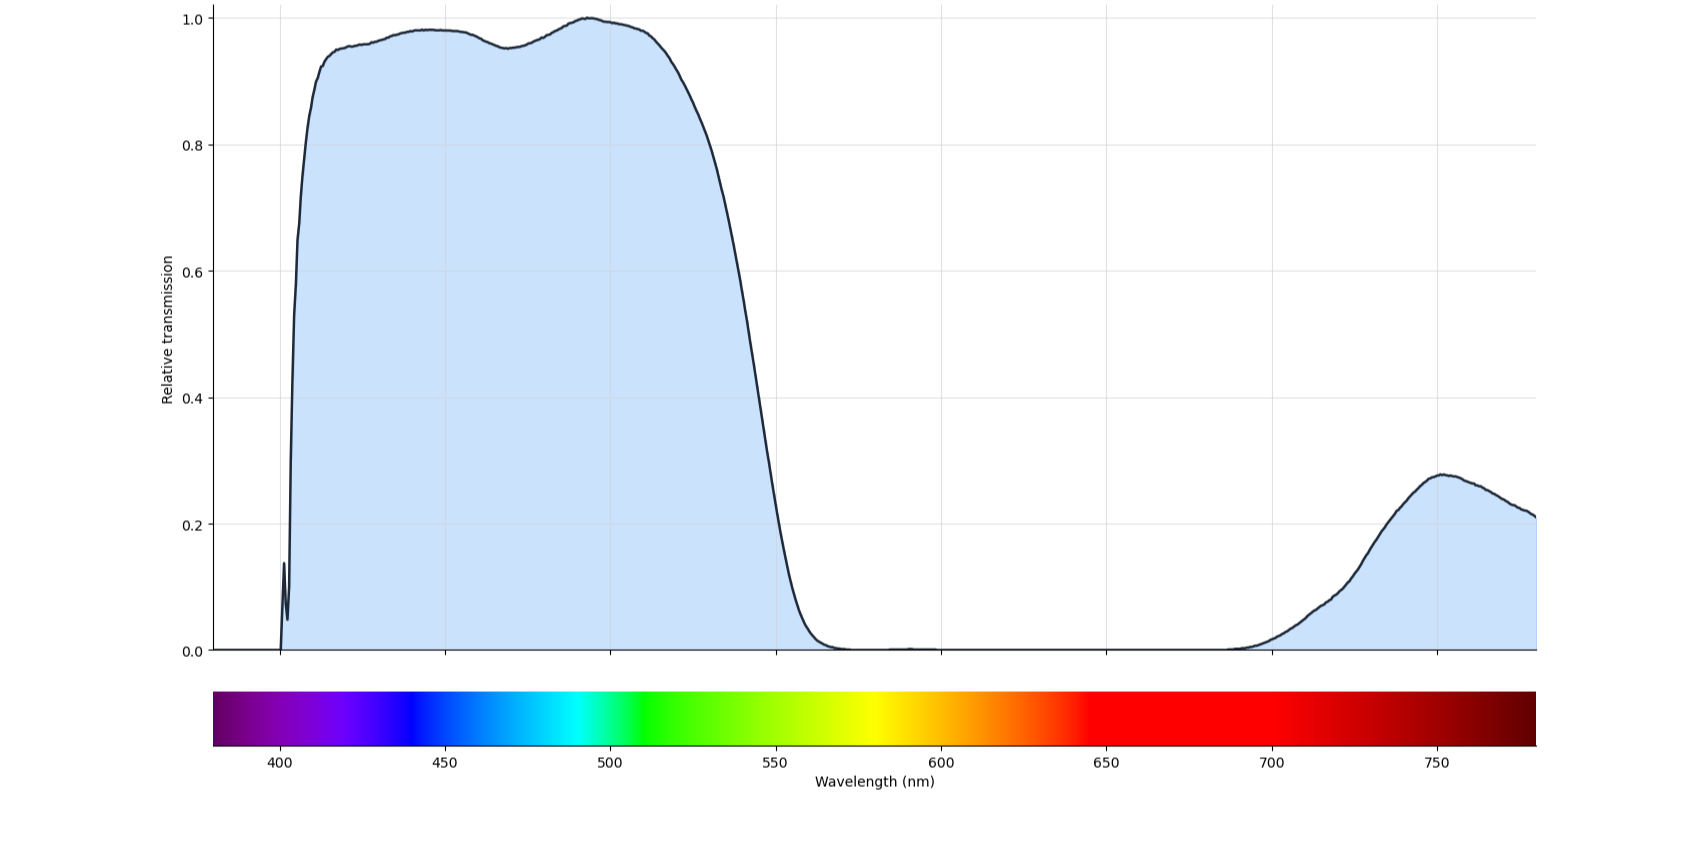
Aerochrome Imitator #3
This is, yet again, another filter that seeks to mimic Kodak Aerochrome. However, this one is one order of magnitude cheaper than the previous two. I seriously doubt if anyone not committed to IR photography will ever buy the previous two filters at 77mm thread or larger since the price at that size is prohibitive; for this one, it is significantly more affordable.
At this point we can conclude confidently that Aerochrome on a digital sensor is basically just removing the visible yellow to red spectrum and replace it with a stronger infrared, which checks out with the film trichrome approach.
C-800 gave a CCT readout of the same 50000K; white balance using the color checker gives a reading of 7700/-66.
As a poor man’s Aerochrome, while the effect directly out of camera is not very good, it is quite possible to compensate that in post.
Color Enhancement
The idea of this filter is to reject some of the secondary wavelengths so that the primary color becomes more vibrant. Have to say, this idea sounds very Technicolor, and judging by the transmission, it does exactly that:
Directly in camera the view is nothing but magenta. C-800 says the CCT is 5750K; white balance using the color checker gives a reading of 2150/-100.
The filter claim it should work with full spectrum cameras. However, even after white balancing, the scene does not really have the vibrancy one would expect from the claim.
It does have a film look to it, in my biased view: quite reminiscent to Kodak aero recon films.
Middle Rejection #1
I don’t know what a proper name would be, no one has given a name to this look yet. The spectrum transmission look like the following:
Visually, this filter looks to be of a deeper blue than the Aerochrome imitators (which is making me suspect if it has a huge UV transmission that is unfortunately being ignored here). The transmission graph shows that it cuts down very much the entire visible spectrum, with just a little blue leaking through.
C-800 CCT is back to 50000K again and white balance using the color checker gives a reading of 2500/-150.
Middle Rejection #2
This filter behaves very similarly to the previous one, including the transmission:
In fact, after seeing the graph, I wondered if this is the same glass with the previous one, just wrapped differently by two different retailers…
C-800 still gave the 50000K CCT (for how often this value appears, I believe it was thrown off by the IR ratio the entire time). Given that white balance using the color checker gives a reading of 2300/-150, at least it is certain that these two are very close.
High Bandpass w/ Peak
This filter seems to be a modified 720nm IR filter, as there is a clear peak around the 720 range.
Hilariously, C-800 cannot give any CCT reading for this filter. White balance using the color checker gives a reading of 2000/-55. Due to the range is quite one directional, there is very little room to create color separation, as shown in the image below.
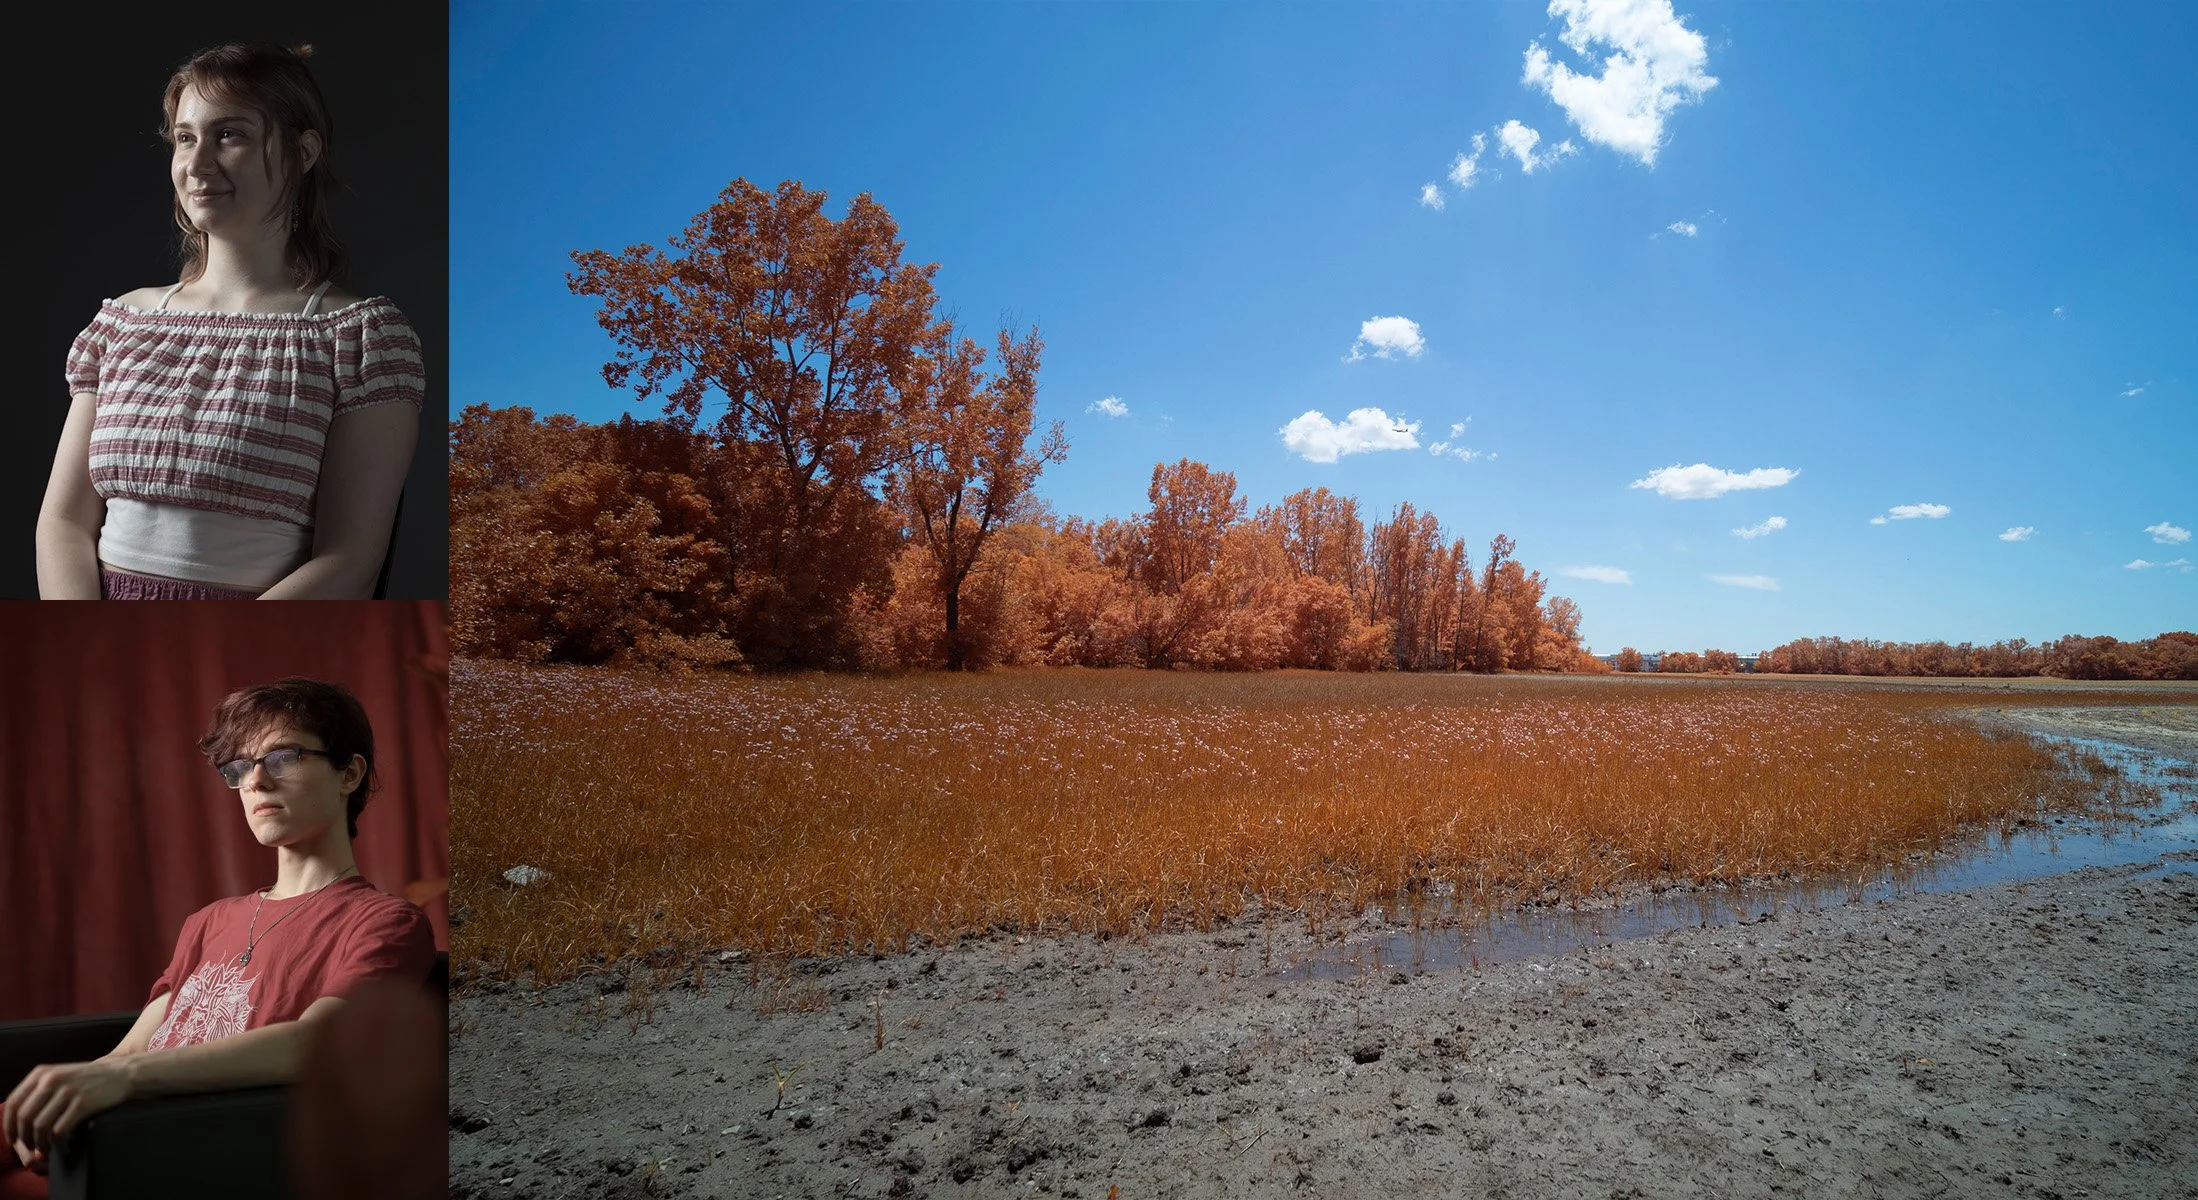
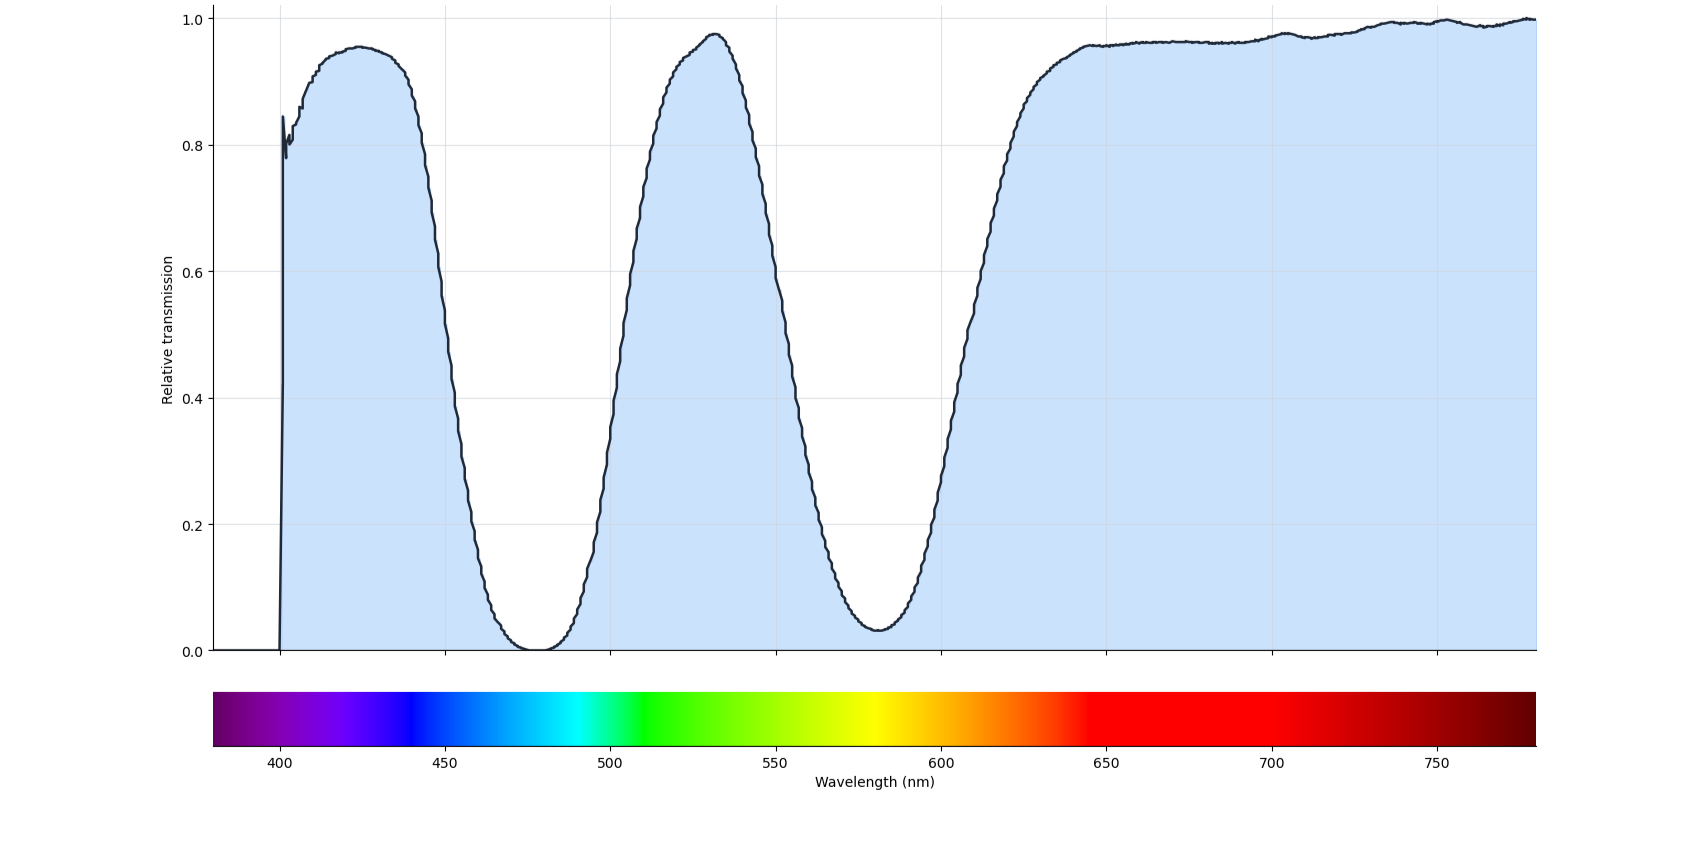
UVIR-cut
The last one is a UVIR cut filter, which should temporarily convert an IR camera into normal camera. The spectral transmission of the selected UVIR cut filter looks like the following:
And the demo images:
Color checker reports 5300/34, very much expected and ordinary for normal photography.